Ab Roll Out Form with a Safe Range Ladder
 14 min
“Roll as far as you can” is poor advice for learning the ab roll out. A shorter reach with a steady low back is more useful than a long reach you finish by arching, sagging, or throwing your hips backward. Your first goal isn't a bigger rep count or a standing attempt. It's a measured distance you can repeat without changing shape.
Table of Contents
- Pick Your Ab Roll Out Range First
- Home Setup for Knees Wrists and Shoulders
- How to Brace and Perform One Ab Roll Out
- Sets and the Rule for a Longer Reach
- Faults That Mean the Set Is Over
- Keep the Roll Out Inside a Small Week
Pick Your Ab Roll Out Range First
Start with a wall stop, then advance only when every repetition passes the same form test. Don't choose your range by how far the wheel can travel. Choose it by how far your trunk can stay controlled.
The ab roll out is a wheel movement performed from the knees, or eventually the feet. Unlike a crunch, its main job is anti-extension, resisting the tendency for the lower back to arch as you reach forward. In a Physical Therapy comparison of abdominal exercises, wheel-based variations produced high activity in several abdominal and supporting muscles, but that doesn't make an uncontrolled reach useful.
Choose a repeatable stopping point
Set your endpoint before you begin. Use a wall as a physical stop or a towel laid beside the wheel's path as a visible marker. Don't roll onto a loose towel that could slide underneath you.
Ab roll out range ladder
| Stage | Setup | Stop point | Pass test |
|---|---|---|---|
| Wall stop | Kneeling, wheel under shoulders | Hands approach a preset wall as the wheel meets it | Ribs down, no extra lumbar arch |
| Elevated rollout | Hands and wheel on a stable bench, couch platform, or low box | Body stays more upright than on the floor | Pelvis slightly tucked, wheel straight |
| Short floor rollout | Kneeling on the floor | A small forward reach, before the belt line drops | Belt line stays level |
| Full kneeling rollout | Kneeling, no external stop | Long line from knees to hands, brief pause | Last rep matches the first |
| Standing rollout | Feet down, much longer lever | Only after full kneeling is consistent | Same spinal position as the kneeling standard |
For work at height, the surface must be firm, wide enough for the wheel, and secured against movement. A soft couch cushion or narrow box isn't a suitable rolling track. Stop well before any edge.
At every stage, keep your ribs down, pelvis slightly tucked, and wheel tracking straight. Neutral doesn't mean forcing your back completely flat. It means your starting lumbar curve doesn't increase as you move.
Range rule: If your back changes shape before the wheel reaches the marker, move the marker closer.
A walk-out exercise offers a related way to practice moving your hands away while keeping your trunk organized, though it isn't an automatic substitute for shoulder comfort. If even the wall stop makes your ribs flare or your lower back tire first, practice a comfortable forearm plank or dead bug before retrying. There's no benefit in advancing a stage you can't yet brace through.
Home Setup for Knees Wrists and Shoulders
A useful setup lets you concentrate on your trunk instead of sore knees, slipping handles, or a wheel that catches on the floor. You don't need a complicated device. You need a stable wheel that rolls straight and handles you can grip securely.
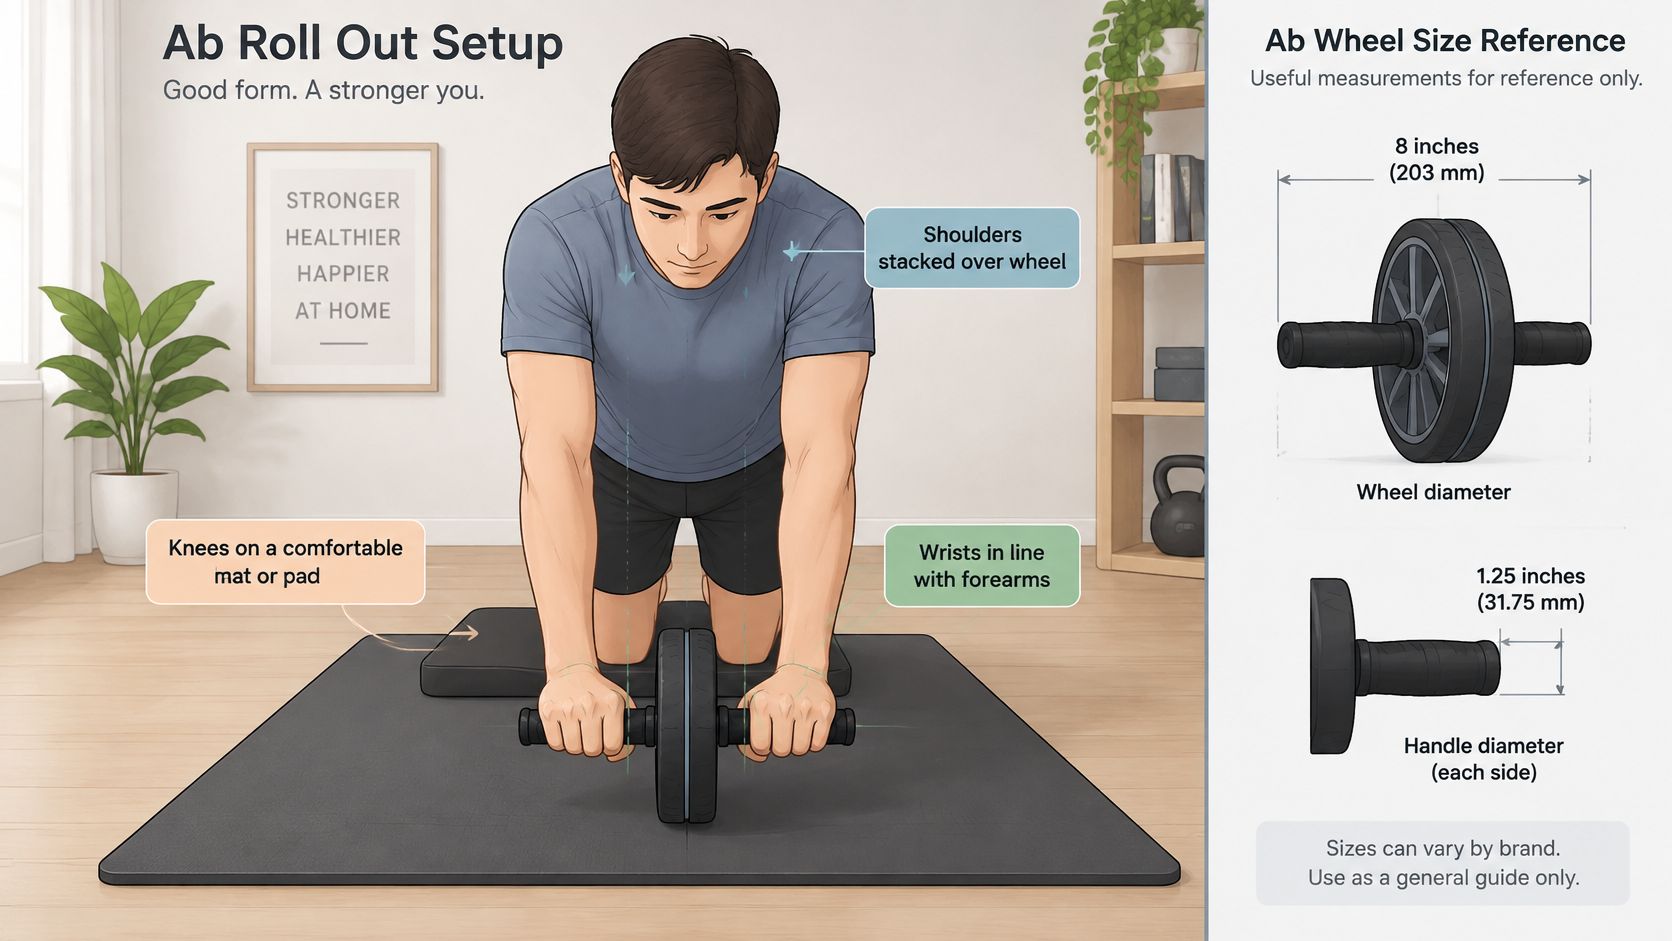
For scale, Rogue Fitness lists an ab wheel with an 8-inch wheel diameter and 1.25-inch handle diameter. Those are reference dimensions, not requirements for good technique.
Use the setup below as a position check before your first attempt.
Make the contact points comfortable
- Knees: Put a folded towel or pad underneath them on a hard floor. Keep padding out of the wheel's path.
- Floor: Test the surface with your hands still close to you. On carpet, check that the wheel doesn't stall and then lurch forward.
- Wrists: Wrap your hands around the handles without letting them fold backward unnecessarily. Try the higher stage if floor loading is uncomfortable.
- Shoulders: Expect muscular loading, not pinching or grinding. Don't push through a painful short reach.
Prop your phone on a book for a clear side view. Include your shoulders, pelvis, and knees so you can see whether your belt line drops.
Keep the knee pad stationary and the rolling path clear. A slippery substitute that shoots forward makes the exercise harder to control, not more productive.
Take a gentle breath out as you prepare, but don't empty your lungs so completely that your torso collapses. Keep enough pressure around your midsection to remain steady while you move.
How to Brace and Perform One Ab Roll Out
Practice the repetition at your chosen marker, not at the distance you hope to reach eventually. The wheel should move because you're controlling it, not because you're falling after it.
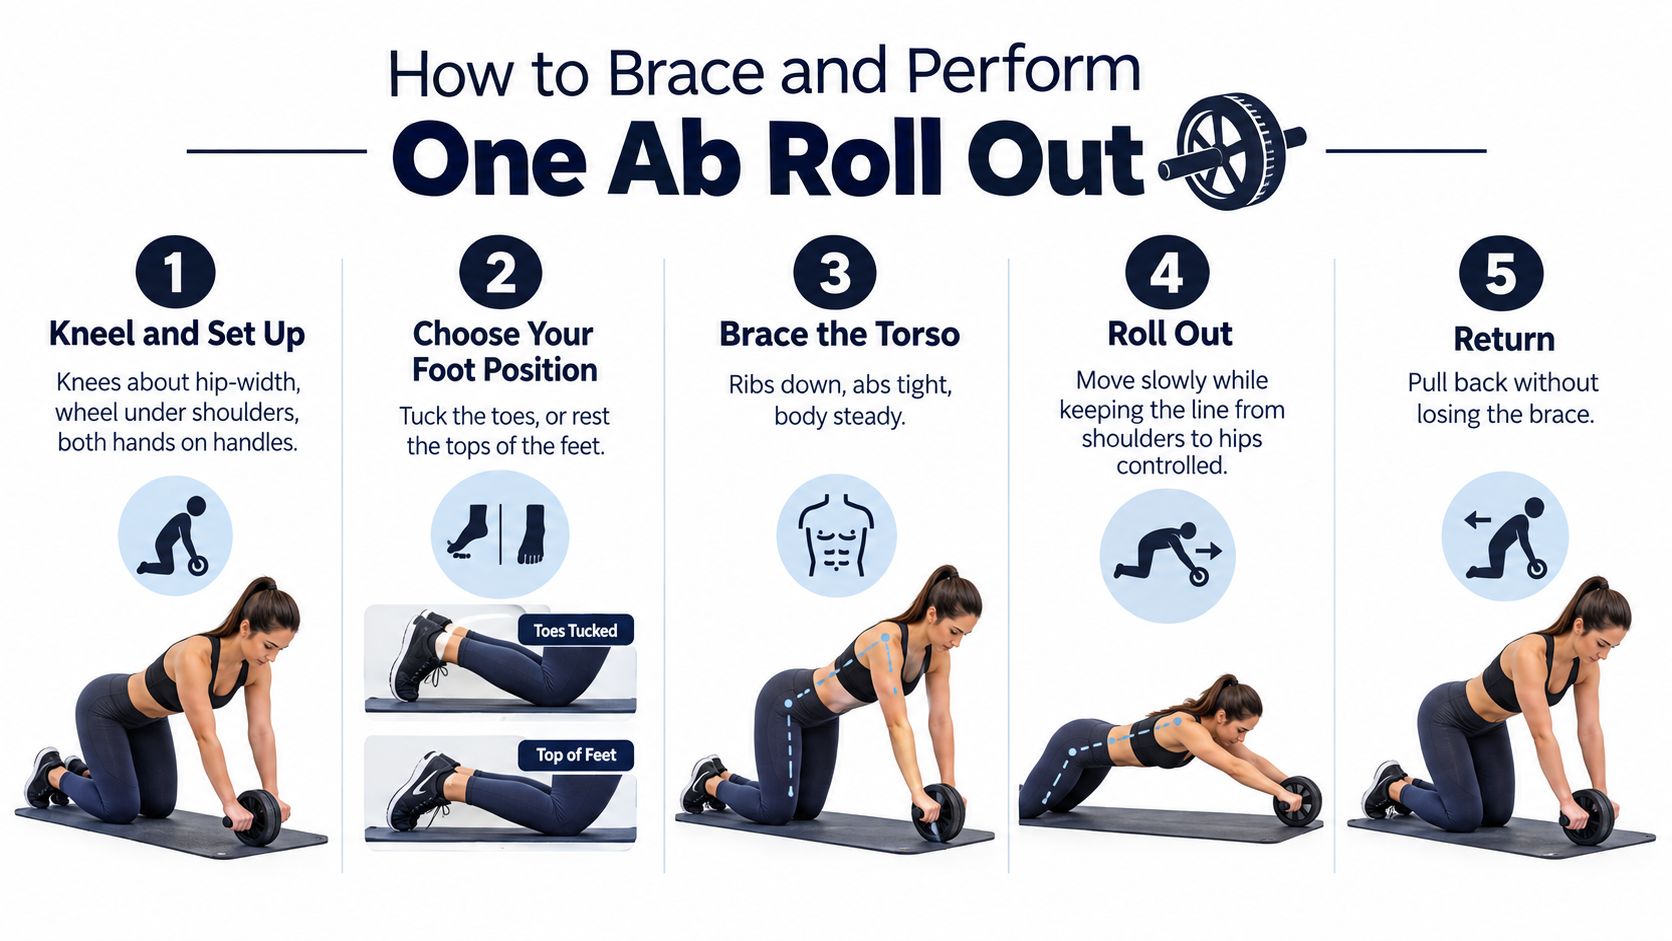
This visual shows the setup, brace, outward reach, and return.
Build the repetition from the brace
-
Kneel and settle your base. Place your knees about hip-width apart, with the wheel under your shoulders and both hands centered on the handles. Tuck your toes, or rest the tops of your feet down if that's more comfortable for your ankles.
-
Set your ribs and pelvis before moving. Exhale gently, bring your lower ribs toward your belt, and tilt your pelvis slightly under. Lightly squeeze your glutes without rounding your entire back. You're establishing a position to maintain, not performing a crunch.
-
Reach forward through your shoulders. Keep your elbows softly straight and your neck comfortable. Let your shoulders move with your arms rather than forcing your shoulder blades to stay pinned together. Your torso should travel forward with the wheel instead of remaining behind while only your arms stretch.
-
Stop at the marker, or sooner. The marker is a limit, not an obligation. If your ribs lift or your hips begin to sink before you reach it, return from that shorter position.
-
Pause without relaxing. Hold the endpoint briefly while keeping pressure through the handles. Don't hang from your shoulders or let your stomach drop toward the floor.
-
Bring the wheel back under control. Press into the handles and guide your shoulders and hips back together. Avoid shooting your backside toward your heels while leaving your chest stretched forward. That folds the movement at the hips rather than controlling the return.
-
Reset before repeating. Settle the wheel under your shoulders, take a controlled breath, and restore your starting position. Don't rush straight into another reach if you've lost the brace.
Understand the difficult part
The endpoint feels harder because you've made your body a longer lever. Your abdominals must resist a greater tendency to arch while your shoulders support the reach. That's why a small increase in distance can feel much harder without adding a single repetition.
The bracing idea is similar to a push-up position plank: maintain the relationship between your ribs and pelvis while your arms support you. The difference is that the rollout changes the demand as you move.
Watch a moving demonstration, paying particular attention to the return.
Avoid holding your breath until you're forced to gasp, letting the wheel drift sideways, or bouncing out of the endpoint. A clean repetition feels firm through the trunk, quiet in the lower back, and deliberate on the way home. Make the return slow enough that you could stop it rather than relying on momentum.
Sets and the Rule for a Longer Reach
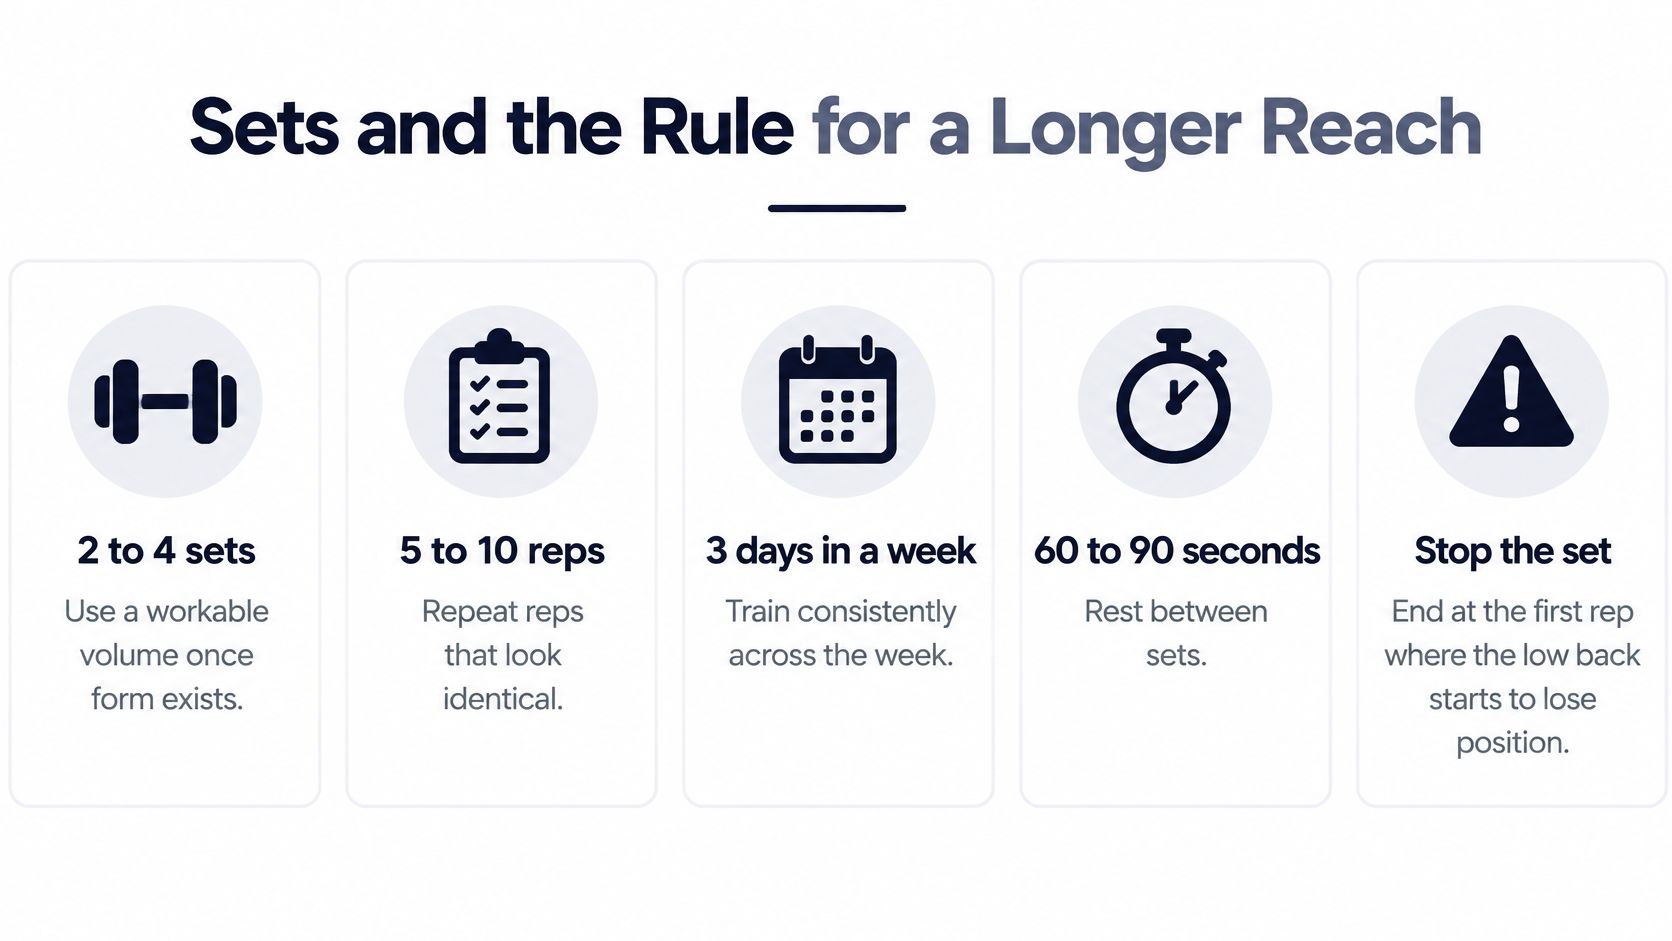
Use a modest working dose once you can repeat your chosen range. As a practical starting prescription, aim for 2–4 sets of 5–10 technically identical repetitions, adjusting downward whenever you can't preserve position. Treat this as a coaching starting point, not a requirement to finish the numbers.
Change reach or repetitions, not both at once. When your current range feels manageable across all your sets, move the endpoint slightly farther away and keep the repetition target steady. If you're still learning the movement, repeat the same mark instead.
Log more than the rep count
In a controlled ab-wheel electromyography study of eight resistance-trained men, rectus-abdominis activity differed across neutral, 90-degree, and 150-degree arm positions, while pectoralis-major activity increased between neutral and 150 degrees. These were isometric tests, not proof of an ideal workout prescription, but they demonstrate why body position matters.
A short wall-assisted repetition and a long kneeling repetition shouldn't be logged as interchangeable accomplishments. Record enough detail to reproduce the task:
- Stage: Wall stop, raised, short floor, or full kneeling.
- Reach: The wall position or floor marker you used.
- Completed work: Only repetitions that met your form standard.
- Response: Whether your trunk, shoulders, and wrists tolerated the session comfortably.
Suppose you complete your planned work at a wall stop and the side-view recording looks steady. At the next session, repeat that distance rather than assuming you need a harder version. When you do extend the reach, let that be the progression instead of adding more work at the same time.
Progression check: Finish feeling that you could repeat the same shape, not that you survived the final return.
Rest until you can set up and brace deliberately again. If you're still breathing too hard to organize your torso, don't start because a timer has ended.
Muscular fatigue can feel like increasing abdominal effort while your position stays unchanged. Technique breakdown is different: your body begins finding another way to finish. Only the former supports continuing with the planned work.
Faults That Mean the Set Is Over
Judge the ab roll out by trunk rigidity, symmetrical wheel travel, and an actively controlled return. Reaching the marker doesn't count as success if you lose any of those standards along the way.
The exercise loads more than your stomach muscles. The ab-wheel muscle-activation study also identifies chest involvement, so shoulder position deserves attention rather than being treated as an incidental detail.
Match the fault to the next adjustment
The causes below are useful coaching possibilities, not diagnoses. A side-view recording can show a change in position, but it can't tell you exactly why a joint hurts.
Ab roll out faults and fixes
| What you see | Likely cause | Change next set |
|---|---|---|
| Low back arches or ribs flare | Reach longer than the brace can control | Shorten to the last neutral mark |
| Hips sag toward the floor | Pelvic position and glute tension aren't maintained | Reset the tuck and cut the reps |
| Hips pike up to return | You're substituting a hip fold for a controlled return | Slow the return and shorten the roll |
| Wheel drifts to one side | Uneven pressure through the handles | Aim at a floor mark and even the hands |
| Pinch at the front of the shoulder | The current position or load isn't tolerated | Stop and regress a stage |
| Wrist ache | Handle position or loading is uncomfortable | Change grip or elevate the hands |
| Breath held until the return | Breathing strategy is disrupting control | Use a gentle exhale without dropping the ribs |
| Bounce at the end range | Momentum replaces control | Pause at the stop before returning |
End the set after the first meaningful fault. Don't add several compromised repetitions to make the log look complete. Record the last range that passed, then use that information to simplify the next attempt.
A small hip movement isn't automatically a failure. The problem is an obvious change in strategy, such as abruptly throwing your hips backward while the wheel barely moves. Compare the return with your cleanest repetition rather than chasing an artificially motionless pelvis.
Treat pain differently from effort
An abdominal burn or general muscular fatigue isn't the same as a sharp shoulder pinch, wrist ache, or localized low-back pain. Don't stretch farther into discomfort to see whether it disappears.
If symptoms persist, pause progression and consult a qualified clinician. A standing attempt won't fix a painful or poorly controlled kneeling rollout. It asks you to manage a more demanding position before you've established a comfortable one.
Keep the Roll Out Inside a Small Week
The ab roll out is a useful anti-extension exercise, not a complete core program. Your chest and shoulders share the work, but the movement doesn't directly cover resisting rotation, side-to-side stability, loaded carries, or controlled spinal flexion.
High muscle activity isn't a verdict on which exercise everyone should choose: an ACE review of abdominal-exercise testing reported lower upper-rectus activation for the ab wheel than the traditional crunch in one comparison, and EMG alone doesn't establish superior growth, performance, or safety.
Make the week easy to repeat
A trained exerciser may be ready to explore a longer lever. Beginners and people returning after inactivity should favor the supported stages, while anyone with ongoing back or shoulder symptoms should seek assessment rather than push through.
Use a simple filming-and-logging routine:
- First training day: Film a comfortable set from the side and identify the reach that stays neutral.
- Next training day: Repeat the same setup and record whether it still feels controlled.
- Final training day: Review your form before deciding whether to keep or extend the marker.
A bodyweight workout journal can help you record the stage and endpoint alongside completed repetitions. Keep demanding rollout sessions separated by recovery, and add complementary work, such as a comfortable side plank or carry, rather than making every core exercise another forward reach.
Your next useful milestone is a calmer, repeatable set at a known distance. Standing can wait.
SuperStrong offers an iPhone app for logging short home workouts on a shared visual wall with friends. Use it alongside your reach notes to keep consistent, controlled practice visible rather than chasing extra repetitions. Visit SuperStrong to see whether that simple logging approach fits your home-training routine.