7 Bear Crawl Exercises for Strength and Mobility
 16 min
Every bear crawl variation doesn't train the same quality. A standard crawl teaches coordination and basic control, while shoulder taps challenge anti-rotation, lateral crawls add side-to-side movement, and a bear hold removes travel entirely so you can train in a very small space. Treating all of them as interchangeable makes it harder to choose the right exercise or track meaningful progress.
The seven bear crawl exercises below are organized by programming purpose, moving from foundation and unilateral stability to directional conditioning, mobility, and isometric work. You can progress with seconds, repetitions, steps, cycles, or distance, depending on the variation. Harvard Health describes the bear crawl as a short, measurable movement that can be prescribed for time or distance, rather than as a long continuous workout (Harvard Health's bear crawl guidance).
Short sets also fit SuperStrong's micro-workout approach. You can log a bodyweight set between daily tasks, then review the effort on a private shared wall with up to four friends.
Table of Contents
- 1. Standard Bear Crawl
- 2. Bear Crawl With Shoulder Taps
- 3. Bear Crawl Forward and Backward
- 4. Bear Crawl With Leg Lifts
- 5. Lateral Bear Crawl
- 6. Bear Crawl to Down Dog Transition
- 7. Bear Crawl Holds Isometric
- 7 Bear Crawl Variations Comparison
- Turn Seven Variations Into a Simple Rotation
1. Standard Bear Crawl
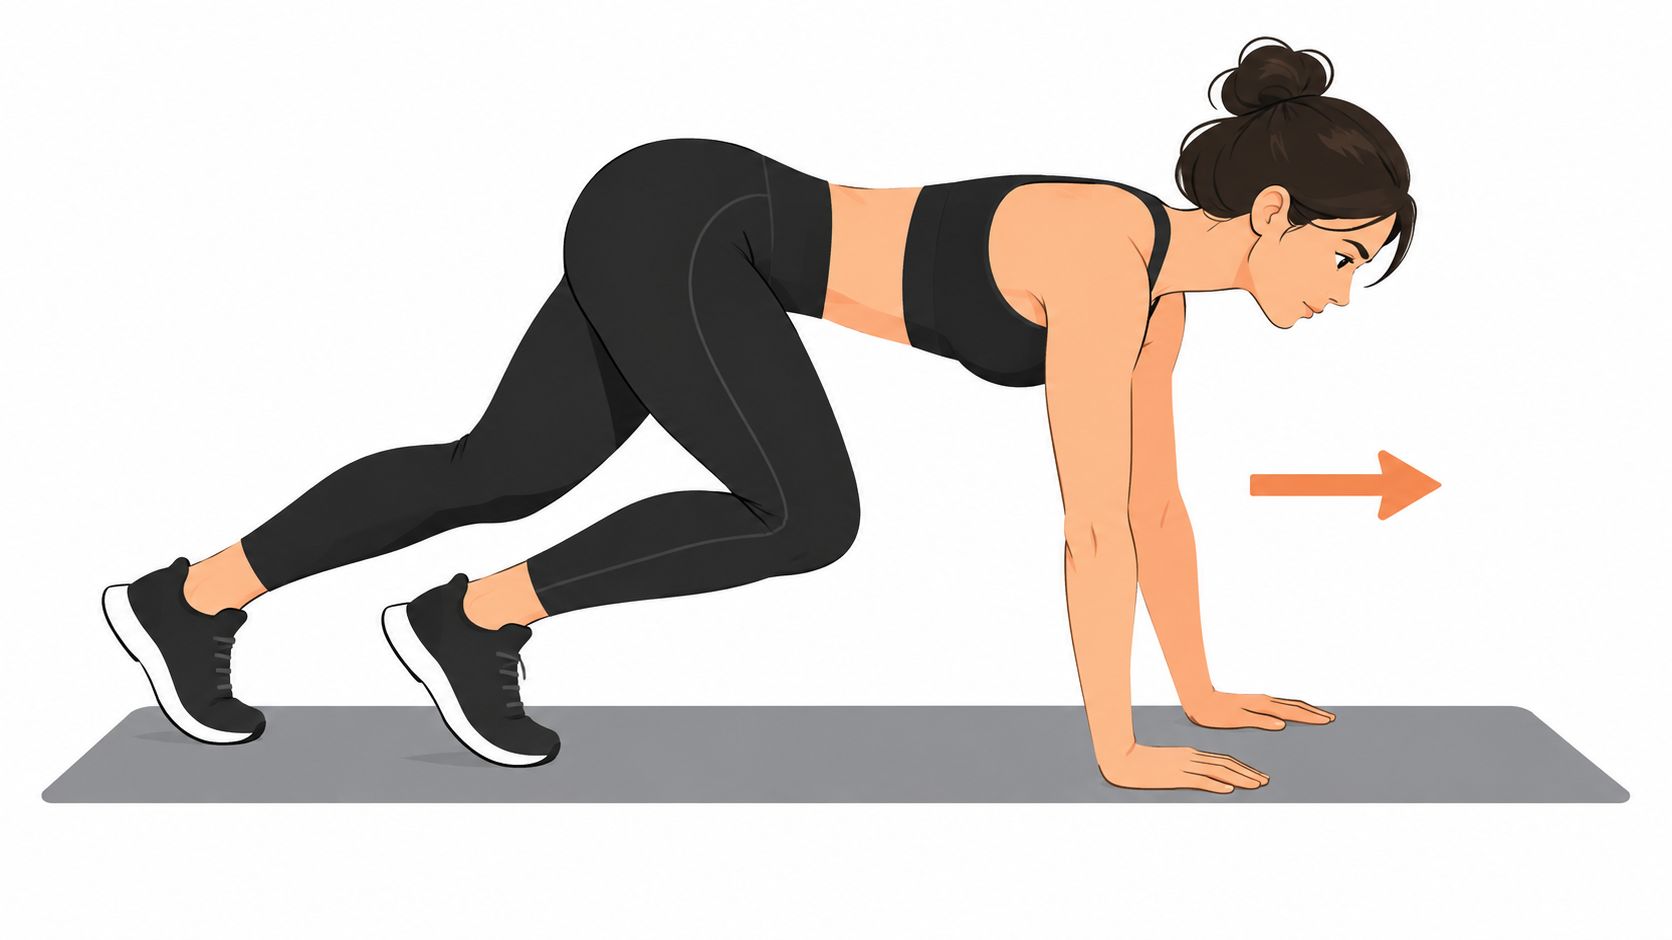
The standard bear crawl is a foundation exercise, not merely an easy version of the others. Begin on your hands and feet with your knees hovering above the floor, hands beneath your shoulders, and hips held in a controlled tabletop position. Move the opposite hand and foot together, then alternate while keeping your back steady.
Its training purpose is coordination and basic control. Your shoulders, trunk, hips, and legs share the work, so moving quickly can hide poor positioning rather than build useful conditioning. Keep the hips from sagging, twisting, or rising too high.
Build a clean foundation
Start with short bursts of 10 to 15 seconds. Add time only after you can keep your torso level and your steps controlled. These ranges are practical programming suggestions, not universal standards. A yoga mat or other padded surface can reduce discomfort for your hands, wrists, knees, and feet.
Form priority: Move slowly enough to keep your hips quiet. A shorter controlled crawl gives you more useful practice than a fast crawl that breaks down immediately.
Use the standard crawl when the goal is to learn the pattern, prepare for harder variations, or train in minimal space. A beginner could place short sets on selected training days, while a small friend group could use it in a warm-up. Record each timed set in a workout journal app, so changes in duration are easy to compare.
2. Bear Crawl With Shoulder Taps
Shoulder taps change the bear crawl from a moving coordination drill into a focused core-stability exercise. From the bear position, lift one hand, tap the opposite shoulder, return it to the floor, and switch sides. Removing one point of contact makes your trunk resist rotation, like a table staying level after one leg briefly lifts.
Keep the tap quiet and controlled. If your hips shift toward the raised hand, your body is using momentum to find balance instead of controlling the position. Begin with a wider foot stance, then narrow it gradually as your stability improves.
Use reps to measure control
Start with 8 to 10 repetitions per side and treat the range as a practical starting point, not a universal prescription. Rest between rounds when needed. Fatigue should not make your hips rotate or your shoulders collapse.
A beginner can place shoulder-tap sets on alternating days with standard crawling, giving the harder variation its own practice time. More experienced trainees can set a weekly repetition target and add repetitions only when each tap remains stable. In a group, use controlled repetitions as the challenge rather than racing through the movement.
- Keep the hips square: Aim your hip bones straight toward the floor.
- Tap lightly: Bring the hand to the shoulder without reaching or striking.
- Protect the wrists: Use a padded surface, and stop if shifting weight causes sharp discomfort.
- Track the right variable: Count repetitions when the goal is to monitor unilateral control.
Use this variation in a core-stability slot. It suits short, deliberate sets more than the end of a conditioning circuit, where fatigue can hide loss of control. If your torso rotates repeatedly, widen your feet, reduce the repetitions, or return to the standard crawl until the position feels steady.
3. Bear Crawl Forward and Backward
Forward crawling gives you a visible route and a predictable next step. Reversing the direction changes the training demand: your arms and legs still coordinate across the body, while your spatial awareness must guide each placement without constant visual confirmation. Use this variation for conditioning when you want direction changes, or for minimal-space training when a short path is all you have.
Crawl forward, then reverse the pattern to return to your starting point. Keep each step compact. During the backward phase, move slowly enough to sense where your hand and foot will land before transferring weight. Treat the reversal like backing a vehicle into a narrow space: smaller corrections are easier to control than rushed ones.
Program the direction
Choose a clear hallway, an uncluttered room, or a path beside a wall. Beginners can use a short forward-and-back distance. More experienced trainees can work by time, following Harvard Health's guidance for using time or distance to structure the basic crawl and its challenge options (Harvard Health's movement instructions).
Someone working from home can use a brief set during a coffee break and record the completed cycles in a workout journal app. Training with friends? Compare controlled cycles rather than raw speed. That keeps the goal repeatable technique.
Clear the floor before backward crawling. A small obstacle can interrupt hand placement and turn a controlled drill into an awkward emergency step.
Use time when you want a simple conditioning block. Use cycles or distance when you want to emphasize direction and spatial control. If your back arches, hips collapse, or shoulders feel unstable, shorten the set and slow the reversal.
4. Bear Crawl With Leg Lifts
The leg-lift bear crawl belongs in a program for core and pelvic control, not as a replacement for heavy glute training. From the bear position, lift one foot slightly while keeping the hands, the other foot, and the trunk steady. Return the foot, then switch sides. Removing one contact point is like taking a leg off a table: the smaller base makes every shift easier to detect.
The main demand is resisting pelvic rotation while the shoulders stay stacked over the hands. Your glutes and lower back contribute, but the limited loading makes this a coordination and stability drill rather than a maximal strength exercise. Use it when you want to make the foundation crawl more precise or add a controlled lower-body challenge without needing extra space.
Keep the lift small
Raise the foot only a little. A high lift gives the pelvis room to rotate and the lower back room to arch, which changes the exercise before it makes it harder. Brace gently before the foot leaves the floor, move slowly, and return it under control.
A beginner can perform a few clean repetitions per side and stop when the hips begin to sway. During a short work break, alternating lifts provide a compact movement practice. In a group, count controlled repetitions rather than chasing a larger total after technique has deteriorated.
- Brace before lifting: Create light abdominal tension before shifting weight.
- Stay level: Keep both hip bones facing the floor, as though balancing a tray across the pelvis.
- Control the return: Place the foot down instead of dropping it.
- Reduce the volume when needed: Fewer precise repetitions provide better practice than forced ones.
- Log repetitions: Rep-based tracking makes changes in control easier to review than an unrestricted timed set.
Choose leg lifts when the programming goal is core and pelvic control. Choose shoulder taps when resisting upper-body rotation is the priority. If you want conditioning, use a crawling variation that keeps all four points moving instead of turning each lift into a rushed balance test.
5. Lateral Bear Crawl
The lateral bear crawl is a mobility and conditioning choice, not a sideways version of the standard crawl. You travel left or right while keeping your hands and feet coordinated in the low bear position. Because the movement shifts through the frontal plane, your hips and trunk must manage side-to-side changes instead of only forward motion.
Lead with the direction of travel. Move the outside hand and foot a short distance, then bring the opposite hand and foot across without crossing your legs. Keep your chest angled toward the floor and your hips at a consistent height, as though carrying a level tray across your pelvis.
Choose coordination before speed
Sideways crawling often feels awkward because forward-facing drills are more familiar. Start with a few controlled steps in one direction, then repeat the same distance in the other direction. Equal practice helps reveal whether one side is less coordinated.
Use this variation for short conditioning intervals when you want continuous movement in limited space. A narrow hallway can work if the floor is clear and there is enough room to place both hands safely. For a skill-focused session, count steps. For conditioning, use a brief timed effort and stop before your hips begin to rise or rotate.
Practical rule: Move the lead hand, hip, and foot as one unit. Do not let the lead foot pull the rest of your body behind it.
Press the floor away with your hands and keep light abdominal tension. If your wrists become uncomfortable, shorten the interval, choose a more forgiving surface, or return to the standard crawl. Use the lateral version when the goal is side-to-side coordination, hip control, or compact conditioning, rather than adding it to a session without a clear purpose.
6. Bear Crawl to Down Dog Transition
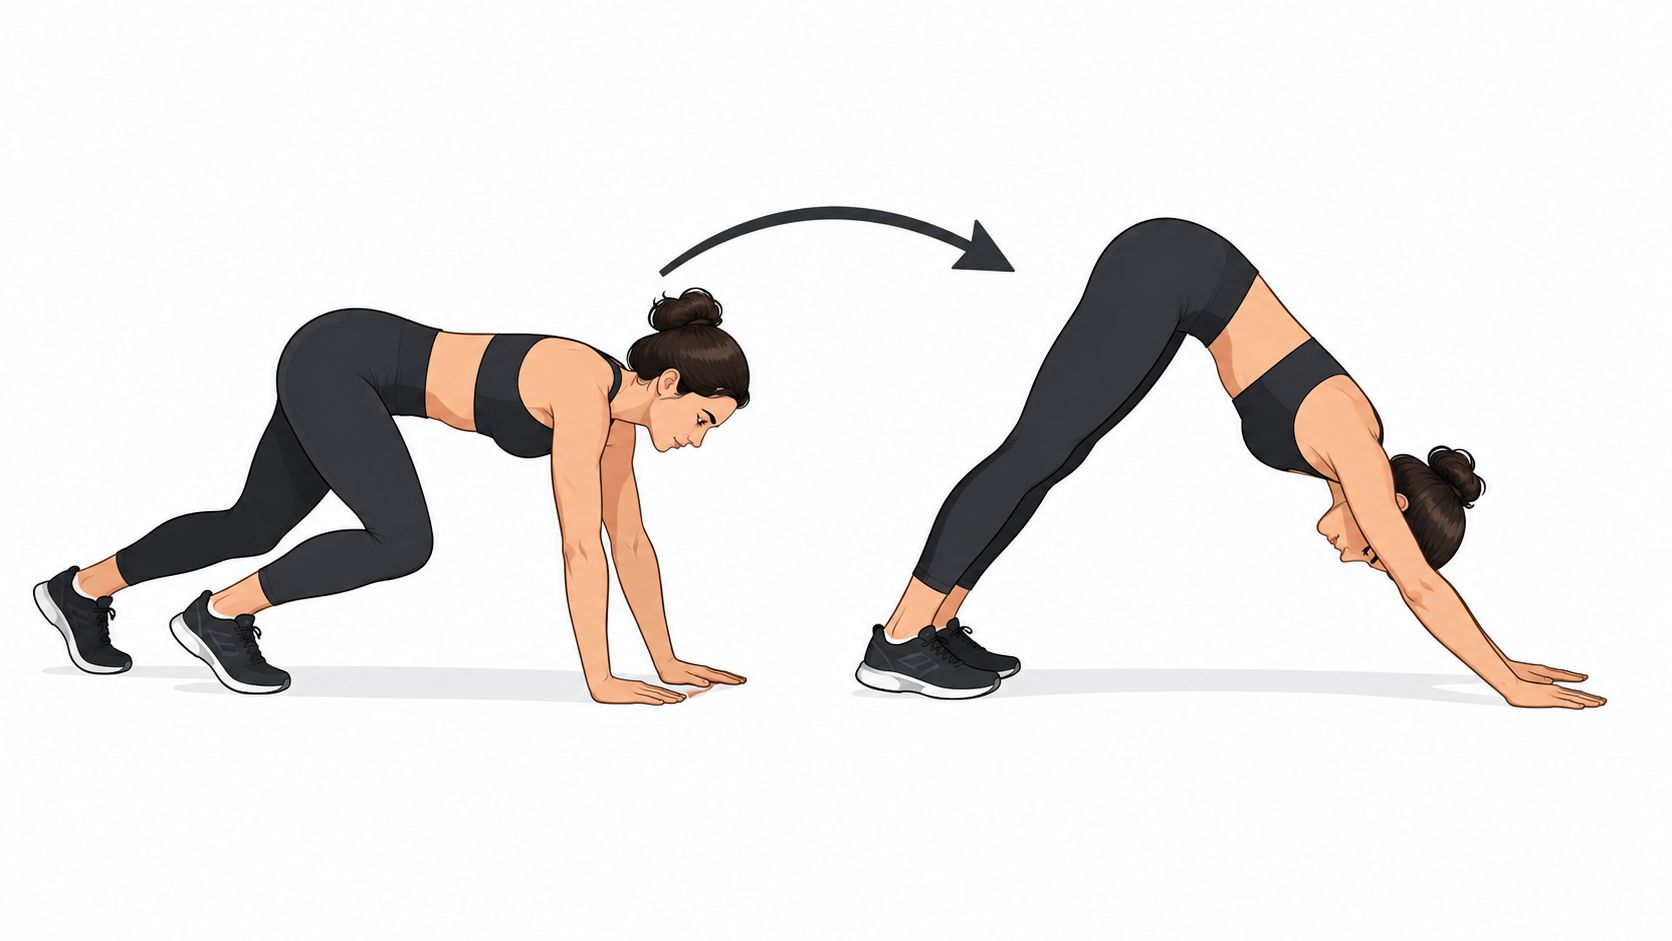
Choose this variation when your goal is mobility with controlled conditioning, not another way to travel. From the bear position, press the floor away and raise your hips into an inverted V. Then lower them with control and return to the bear stance. The higher hip position briefly changes the demand from steady low-level loading to a repeated mobility transition.
In the bear position, your shoulders and trunk resist movement. Downward dog shifts the hips upward and lets you explore a larger range through the shoulders, spine, and backs of the legs. Keep the change deliberate, like moving between two stable platforms, rather than dropping into a passive stretch.
Blend strength and mobility
Begin with a slow transition and pause briefly in both positions. During downward dog, keep actively pressing through your hands and breathe steadily. If your shoulders feel restricted, shift back only as far as you can control. Your heels do not need to reach the floor.
This makes a practical mobility break after prolonged sitting and a useful warm-up choice for a shared training session. If you are returning to exercise, count smooth transitions. If you want a simpler conditioning format, use a timed set while keeping the same controlled rhythm.
Track either the number of transitions or the time spent working. Progress one measure at a time, because adding repetitions and duration together can make technique harder to judge.
Pay attention to the return from downward dog, not just the opening lift. The video below shows how to connect both phases without rushing the flow.
7. Bear Crawl Holds Isometric
The isometric bear crawl hold removes travel and asks you to maintain the position. Set your hands beneath your shoulders, lift your knees, keep your hips controlled, and breathe without letting the torso sag or pike. Because you aren't moving across the floor, the exercise works well when space is limited.
A hold can be easier to organize than a crawl because you don't have to coordinate alternating steps. It can also feel more demanding locally, since the shoulders, trunk, and stabilizers remain loaded without a change in position. That makes it a useful bridge for someone who isn't ready to coordinate locomotion.
Make duration the progression
Start with a manageable timed hold and stop while you can still maintain alignment. Add time gradually only when breathing stays steady and your hips remain level. A timer is more reliable than guessing, especially when a hold begins to feel harder near the end.
A beginner could use an isometric hold as a short home-training set. A busy professional might perform it during a lunch break without needing a clear path. A small friend group could compare controlled duration and celebrate personal records, while each person keeps a range appropriate to their wrists, shoulders, and trunk.
- Breathe continuously: Holding your breath can make the effort feel unnecessarily intense.
- Keep the knees hovering: Don't let them drift toward the floor as fatigue rises.
- Use a forgiving surface: Padding may reduce hand and wrist discomfort.
- Log time, not imagined effort: Duration gives you a clear progression marker.
If the position causes sharp pain rather than ordinary muscular effort, end the set and choose an easier variation or seek individual guidance.
7 Bear Crawl Variations Comparison
| Variation | 🔄 Implementation complexity | ⚡ Resource requirements / space | ⭐ Expected outcomes (effectiveness) | 📊 Key advantages / impact | 💡 Ideal use cases / tips |
|---|---|---|---|---|---|
| Standard Bear Crawl | Low, basic coordination and hip control | No equipment, small clear floor area | Full‑body activation; core & shoulder endurance ⭐⭐⭐ | Accessible, scalable, quick micro‑workout | Warm‑up or short timed sets; start 10–15s, use a mat |
| Bear Crawl with Shoulder Taps | Moderate, unilateral stability and anti‑rotation demand | No equipment but needs shoulder mobility and stable surface | Increased core anti‑rotation and shoulder stability ⭐⭐⭐⭐ | Rep‑countable for clear progression and PRs | Progress after standard crawl; log as reps (8–15 per side) |
| Bear Crawl Forward & Backward | Moderate, spatial awareness and proprioception required | Linear space (hallway or 6–10 ft); clear of obstacles | Enhanced coordination, posterior chain engagement ⭐⭐⭐ | Time‑efficient bidirectional stimulus; prevents directional bias | Use timed rounds (20–30s); practice slow backward first |
| Bear Crawl with Leg Lifts | Moderate‑High, single‑leg stability and core control | Small space, padded surface recommended | Strong glute and lower‑back activation; unilateral strength ⭐⭐⭐⭐ | Rep‑based progression, excellent for lower‑body focus | Lift 2–4" only; log as reps, start 8–10 per leg |
| Lateral Bear Crawl | Moderate, cross‑lateral coordination, frontal‑plane control | Requires lateral space (or short bursts in hallway) | Targets hip abductors/adductors; knee‑health benefits ⭐⭐⭐ | Addresses frontal‑plane weaknesses; low impact | Start 10 steps per side; lead with the hip, not the foot |
| Bear Crawl → Down Dog Transition | High, coordinated transitions and timing | Minimal space; padded mat advised for wrists | Combines strength + mobility; shoulder ROM & posterior stretch ⭐⭐⭐⭐ | Dual benefit (mobility + strength), engaging flow | Perform 5–8 smooth transitions; log by time or transition count |
| Bear Crawl Holds (Isometric) | Low, static position, focus on tension control | Minimal space, mat recommended for comfort | Exceptional time‑under‑tension for core & shoulders ⭐⭐⭐ | Space‑efficient endurance work; easy time‑based progression | Start 20–30s holds, increase gradually; breathe steadily |
Turn Seven Variations Into a Simple Rotation
You don't need to perform all seven bear crawl exercises in one workout. Match the variation to the quality you want to practice. Use the standard bear crawl for foundational coordination and whole-body conditioning. Choose shoulder taps or leg lifts when you want more anti-rotation and unilateral stability. Use forward-and-backward or lateral crawls when direction and short conditioning efforts matter more than staying in one plane.
The bear crawl to down dog transition fits a mobility-focused warm-up or movement break. The isometric hold is the practical choice for minimal-space training because it requires no travel. Harvard Health recommends short, measurable programming for the basic bear crawl, such as a set time or distance, which supports using the movement as a repeatable dose rather than an undefined challenge (Harvard Health's programming example).
Start with one variation. Pick one variable to track, such as seconds, repetitions, steps, cycles, or transitions. Repeat that format until you can perform it consistently, then progress gradually. If you change the movement, duration, speed, and volume together, you won't know which adjustment caused your technique to improve or deteriorate.
A three-training-day rhythm can keep the plan manageable. For example, use the standard crawl on the first day, shoulder taps or leg lifts on the second, and a directional, mobility, or isometric option on the third. SuperStrong can make these short sets visible on a shared wall, where up to four friends can log effort, recognize personal records, and maintain a simple sense of accountability without relying on complicated charts.
Bear crawls place repeated demands on the wrists, shoulders, knees, and back. Modify the hand position, reduce the duration, use padding, or choose a static version if discomfort appears. Stop any movement that aggravates pain, and get individualized advice from a qualified clinician or trainer when an existing injury, pregnancy, or mobility limitation affects your ability to load these joints safely.
SuperStrong helps you log short at-home bodyweight sets as visible tiles on a private shared wall with up to four friends, making bear crawl time, steps, and repetitions easier to review. If you want a simple three-training-day rhythm for micro-workouts, visit SuperStrong and turn your next controlled crawl into a trackable habit.
Authored using Outrank tool