How to Do Squats at Home Without Equipment: Step by Step
 14 min
You're between calls, the kettle is on, and you have maybe two minutes before someone needs you again. A long workout isn't happening, but standing up, moving well, and getting a few clean reps done is realistic. That's the right frame for learning how to do squats at home without equipment. Don't chase depth or a big rep count first. Learn one controlled pattern, check what limits you, pick a starting level that fits today, then repeat short sets between daily tasks. I would rather see three clean reps you can repeat tomorrow than twenty rushed reps that leave your knees aching and your form unrecognizable by the end.
Table of Contents
- The Basic Squat in Six Steps
- Mobility Checks Before You Squat Deeper
- Pick Your Starter Row and Build Week One
- Symptoms, Causes and Fixes
- Progressions Once Your Form Holds
- Fitting Squat Snacks Into Your Day
The Basic Squat in Six Steps
Use the same setup every time so you can tell whether you're improving. Small changes in stance or speed make progress hard to judge.
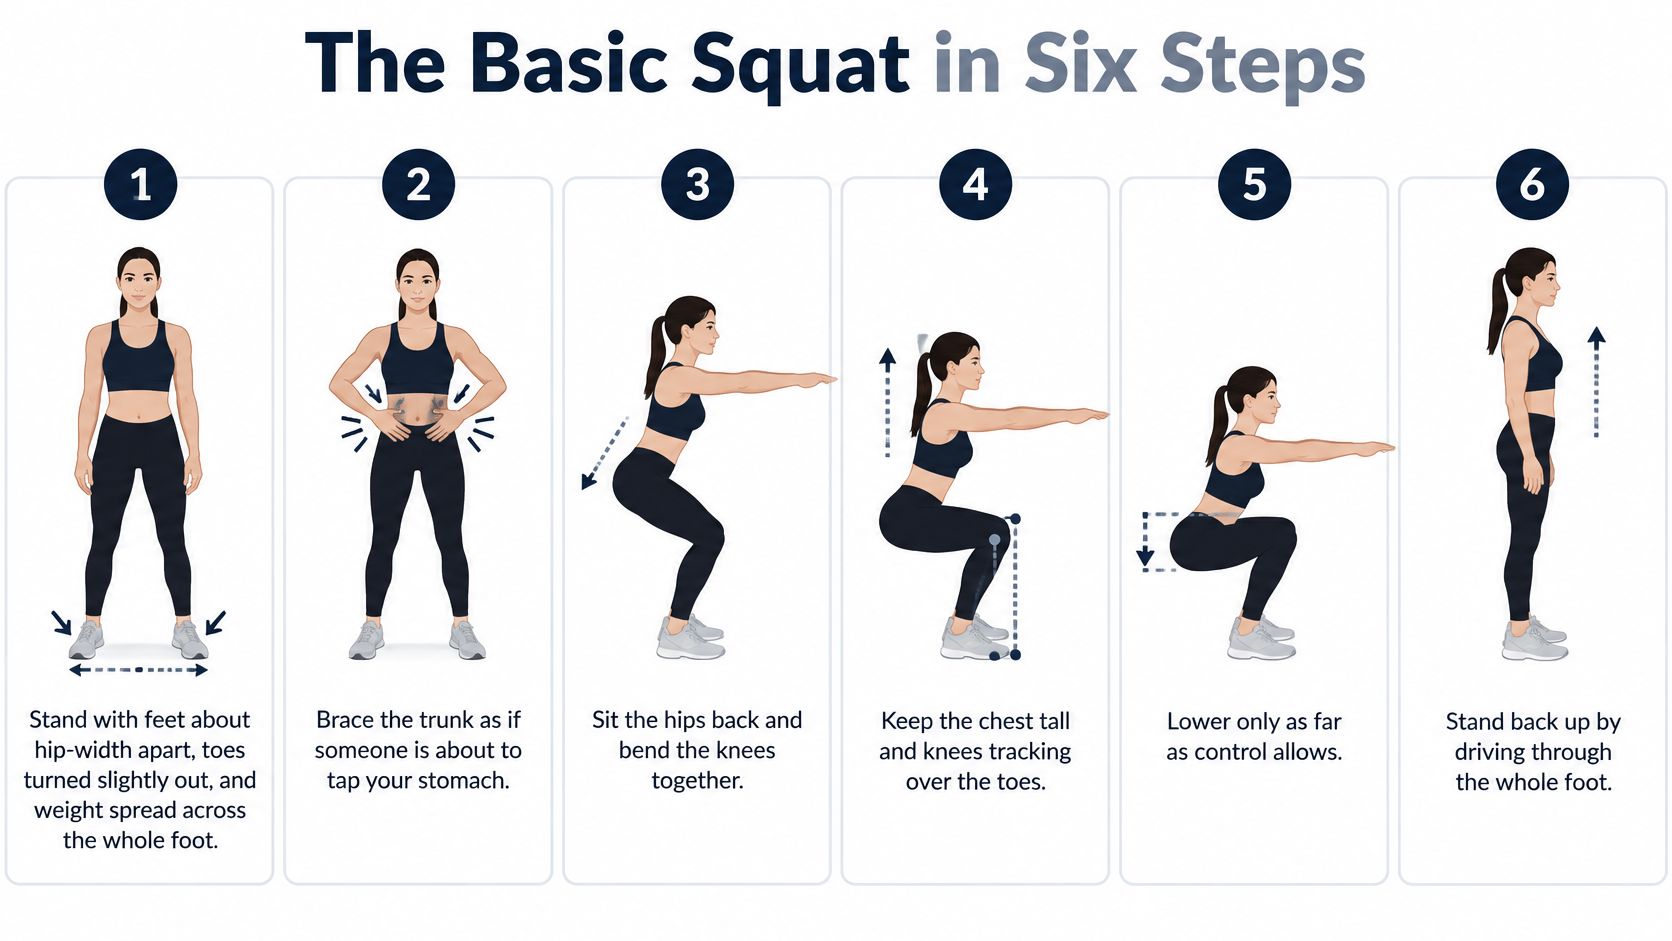
The Six Steps
- Plant your feet: Stand with feet about hip-width to shoulder-width apart, toes turned slightly out, weight spread across the whole foot. A planted foot keeps your ankles and knees stable.
- Brace your trunk: Tighten your middle as if someone were about to poke your stomach. That brace helps keep your spine neutral as you lower.
- Sit hips back and bend knees: Send your hips backward as if sitting onto a chair just behind you, bending your knees at the same time. This keeps weight through your heels and midfoot, not just your toes.
- Track knees over toes: Keep knees moving in the same direction as your toes rather than caving inward. Straight tracking is easier to control and repeat.
- Lower only as far as you control: Descend without pain and without losing your neutral back and pelvis position. Your bottom position is where control ends, not a fixed parallel line.
- Drive through the whole foot: Push the floor away, squeeze your glutes, and stand tall without locking hard or bouncing.
This sequence matches the CDC NCHS data brief on adult physical activity, which notes squats qualify as muscle-strengthening activity and that only 31.0% of adults reported meeting muscle-strengthening recommendations. A simple, repeatable home pattern helps close that gap because it doesn't need a gym slot.
Three Questions Beginners Ask
Can knees pass toes? Yes, slightly, if your heels stay down and your knees track straight. Forcing knees back often pushes your chest forward.
Should heels stay down? Yes. A lifting heel usually means weight has drifted forward or depth is too ambitious for today.
How deep should you go? To the point where your back stays neutral and you can stand smoothly. A chair behind you works as a depth reference if you touch it lightly. Don't bounce off it or sit your weight into it.
A good rep lowers smoothly, stands steadily, and looks the same on rep three as it did on rep one.
Aim for three clean reps in a row before you worry about sets.
Mobility Checks Before You Squat Deeper
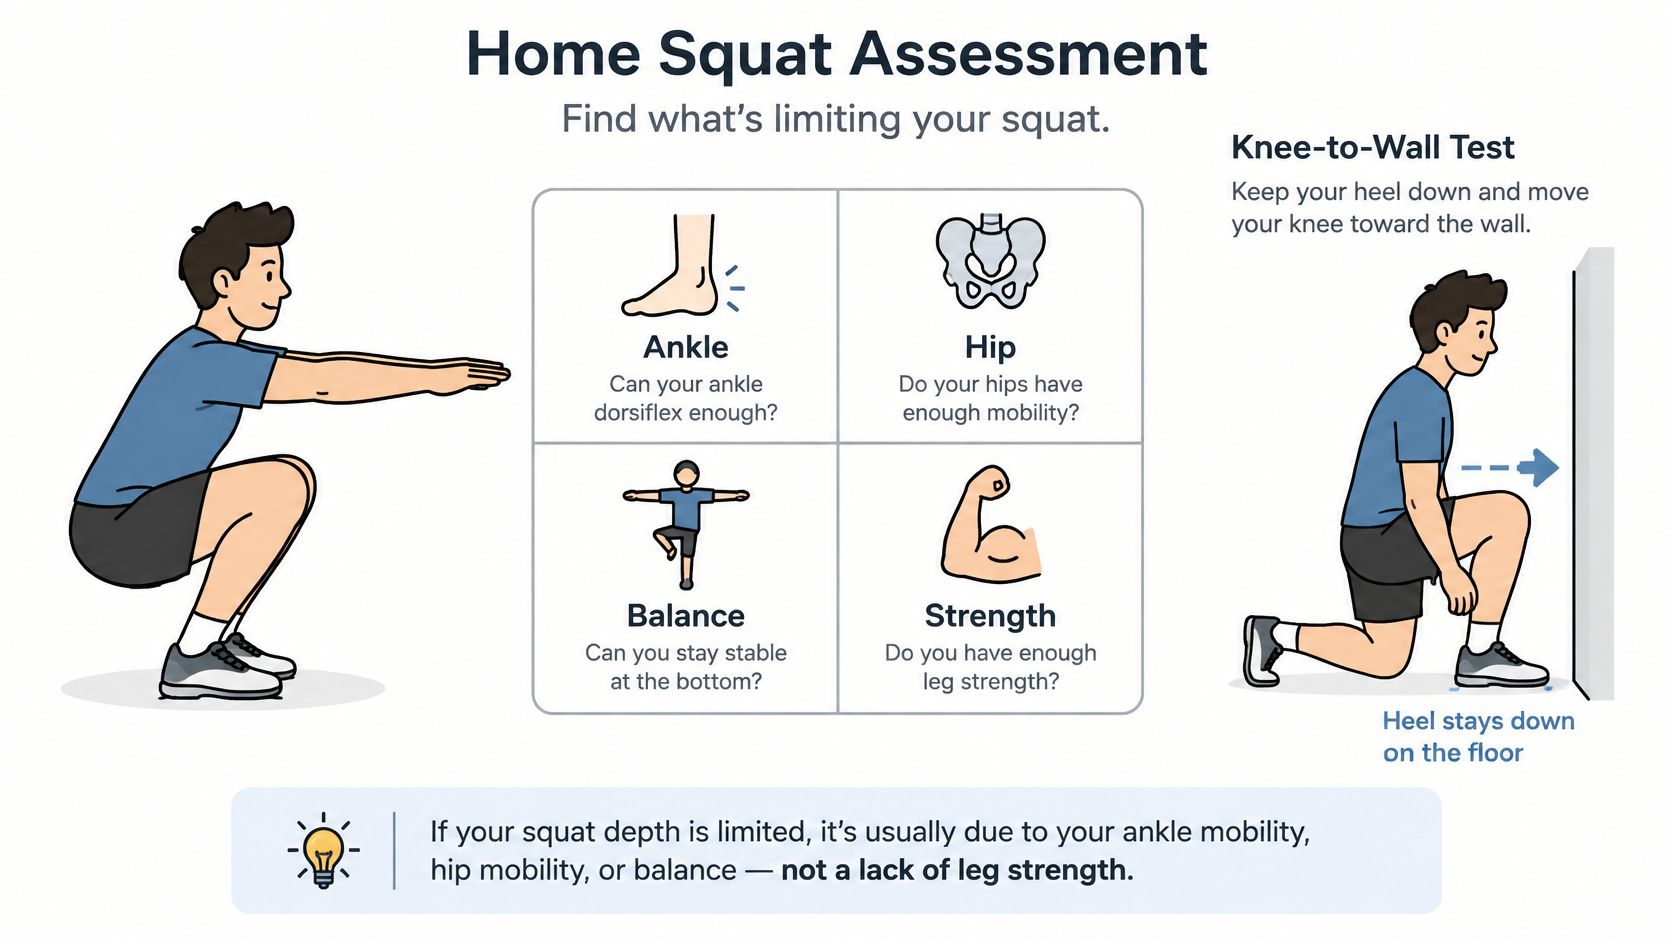
Most squat limits aren't leg strength. An ankle that won't travel, a hip that feels pinched, or balance that wobbles will change your form long before your quads give up. These four checks take under a minute each.
| Check | How to do it | Ready when | If it falls short |
|---|---|---|---|
| Knee-to-wall | Foot about 10 cm from a wall, drive the knee to touch it | Knee touches the wall with the heel down | Use heel-elevated squats or a higher target |
| Chair sit-to-stand | Sit on a chair at knee height and stand five times | Five smooth reps with no hands or rocking | Use a taller chair and start at the Week 1 row |
| Single-leg balance | Stand on one leg for 30 seconds, eyes open | Hold 30 seconds on each side | Hold a countertop or doorframe during squats |
| Depth control | Lower to a chair you touch lightly | Stand without rocking or losing a neutral back | Reduce depth until the back stays neutral |
Test both sides on the knee-to-wall check, heel down throughout. If one ankle is tighter, you'll often see that knee drift inward in a squat, so use a higher target rather than forcing depth.
For balance, stand near a counter and touch it lightly if you need to. Needing support isn't failure. It tells you to squat holding a countertop or doorframe until steadiness improves, which pairs well with a daily bend and reach routine for general mobility.
Watch a controlled demonstration before you test depth on your own.
Prioritizing controlled technique over volume fits the 2025 BJSM review on exercise snacks, which reported improved cardiorespiratory fitness but no clear benefit for lower-limb muscular strength or several cardiometabolic outcomes. More reps aren't automatically better.
Repeat these checks every two to three weeks and note what changed. A home check can't diagnose an injury. If a joint feels sharp or unstable, stop and get clinical advice.
Pick Your Starter Row and Build Week One
If either the knee-to-wall or sit-to-stand check falls short, start on the Week 1 row. If both pass easily and test reps feel light, start on Week 3. Otherwise, Week 1 is the right default.
Set Your Depth First
Stand in front of a sturdy chair that won't slide. Lower until you lightly touch the seat or come close, then stand without rocking forward. That chair gives you the same depth target each session, so added reps mean real progress rather than gradually shallower reps.
The NHS beginner home exercise programme recommends feet about hip-width apart, using a chair back for balance when necessary, knees aligned toward the big toes, a straight back, and a starting target of 8 to 12 repetitions for mini-squats, with fewer if the movement is painful. It also advises stopping immediately for chest pain, unusual breathlessness, dizziness, nausea, or pain.
| Stage | Sets | Reps | Rest | Move up when |
|---|---|---|---|---|
| Week 1 | 2 sets | 8 reps | About 60 seconds | Two sessions finish with clean form |
| Week 2 | 2 sets | 10 reps | About 60 seconds | Two sessions finish with 2-3 reps in reserve |
| Week 3 | 3 sets | 10 reps | 60-90 seconds | Lowering takes about 3 seconds with no wobble |
| Week 4 | 3 sets | 12 reps | 60-90 seconds | Benchmark of 12 clean reps on two sessions |
How the Week Runs
Train on three training days a week with a rest day between harder sessions, giving you four rest days and a small goal on each training day. That rhythm satisfies at least two strengthening days without turning every day into a test. If you want a structured on-ramp, a squat challenge for beginners can sit alongside this table, provided you don't jump rows early.
I would start with two sets of 8 mini-squats even if that feels easy. Easy first sessions teach position. Hard first sessions teach compensation.
- Log every session: Write date, row, sets, reps, and reps in reserve in a notebook.
- Judge the next morning: Muscle tiredness is fine. Knees or hips feeling sharper than usual means the dose was too much.
- Move up on evidence: Two clean sessions, not one good day, earns the next row.
If you log in SuperStrong, you tap the big key, pick an exercise, set the reps (or seconds for a hold) and confirm, and the tile lands on the wall. Remember that SuperStrong is a log, not a coach and not medical advice, and you should check with a doctor before starting an exercise programme.
Practical rule: A routine is working when the same reps feel easier by week three and your joints feel no worse the next morning.
Stop and see a doctor before continuing if you feel chest pain, dizziness, or unusual breathlessness. Don't try to finish the set through those symptoms.
Symptoms, Causes and Fixes
| Symptom | Likely cause | Fix |
|---|---|---|
| Heels lift off the floor | Limited ankle range or weight shifting forward | Widen the stance slightly and sit the hips further back |
| Knees cave inward | Pushing the knees in to reach depth | Press the knees out over the toes and reduce depth |
| Lower back rounds | Lost trunk brace or descent too deep | Brace before lowering and stop where the back stays neutral |
| Chest drops forward | Weak upper back or limited ankle range | Reach the arms forward and reduce depth |
| Bouncing at the bottom | Momentum used to climb out | Pause one second at the bottom before standing |
| Sharp pain in knee or hip | Range too deep or load added too fast | Stop the set, reduce depth, and see a clinician if it persists |
Most faults come from three sources: depth beyond your control, a lost trunk brace, or momentum. Fix the source and the symptom usually goes with it.
Read the Pattern, Not Just One Rep
Heels lifting on the first rep points to setup or ankle range. Heels lifting only on the last reps points to fatigue. The fix differs. For setup, widen slightly and sit back. For fatigue, end the set.
Knees caving inward often appear when you chase a deeper bottom position than your hips allow. Press knees out over toes, shorten the range, and rebuild. Chasing depth through collapsed knees doesn't count as depth.
Lower back rounding means you've passed the range you can brace through. Stop higher, brace before you move, and stand with control. A neutral back at a higher chair beats a rounded back near the floor.
Bouncing hides weakness at the bottom. A one-second pause removes momentum and shows you what you own.
Effort Versus Pain
Muscle burn in your thighs and glutes that builds gradually is normal effort. Sharp joint pain, pinching, or pain that changes how you move is a stop signal.
Stop the set when technique changes, because tired legs shorten depth and fold the trunk even if you could grind out more reps.
If pain persists after a week of adjusted, shallower practice, see a doctor or physiotherapist rather than adding variations.
Progressions Once Your Form Holds
Keep your squat pattern steady before making it harder: use the same stance, controlled depth, stable knee tracking, and smooth stand. If you have not completed the Week 4 row, stay there and practise rather than adding a progression.
The Readiness Standard
Move on when you can complete 3 sets of 12 to 15 pain-free repetitions at a consistent tempo, with no more than minor form changes, on two or more sessions. This is a practical training threshold, not a standard set by the CDC release on adults meeting physical activity guidelines. The release recommends muscle-strengthening activities on two or more days per week. Use that as general guidance for weekly frequency, not proof that a particular squat variation is right for you.
Pick One Progression at a Time
- Pause squat: Pause for 1 to 2 seconds near the bottom, then stand without bouncing.
- Slow lowering: Take about 3 seconds to descend, keeping the same depth.
- Split squat: Stagger your stance to put more work on one leg. Hold a counter if balance is uncertain.
- Single-leg assisted squat: Use light support from a wall or countertop as one leg leads.
- Stance change: Try a slightly narrower or wider stance only if it feels comfortable and your knees continue to track well.
For example, if you can lower for about 3 seconds through 12 clean reps, replace that tempo with a 1-second pause in week six. Don't add the pause and keep the slow lowering at the same time. Changing one feature makes it easier to judge whether the new variation suits you.
Track clean reps, tempo, or sets, rather than chasing extra depth. A higher count means little if your movement changes as you tire. Stop the set when you can no longer keep the chosen depth and controlled pattern.
Change one variable every two weeks. The slower pace gives you time to judge the effect of each change without piling several new demands onto the same set.
Fitting Squat Snacks Into Your Day
Once your basic pattern is reliable, you don't need to save squats for a single workout. Exercise snacks are short bouts of five minutes or less, repeated through the day between sedentary tasks.
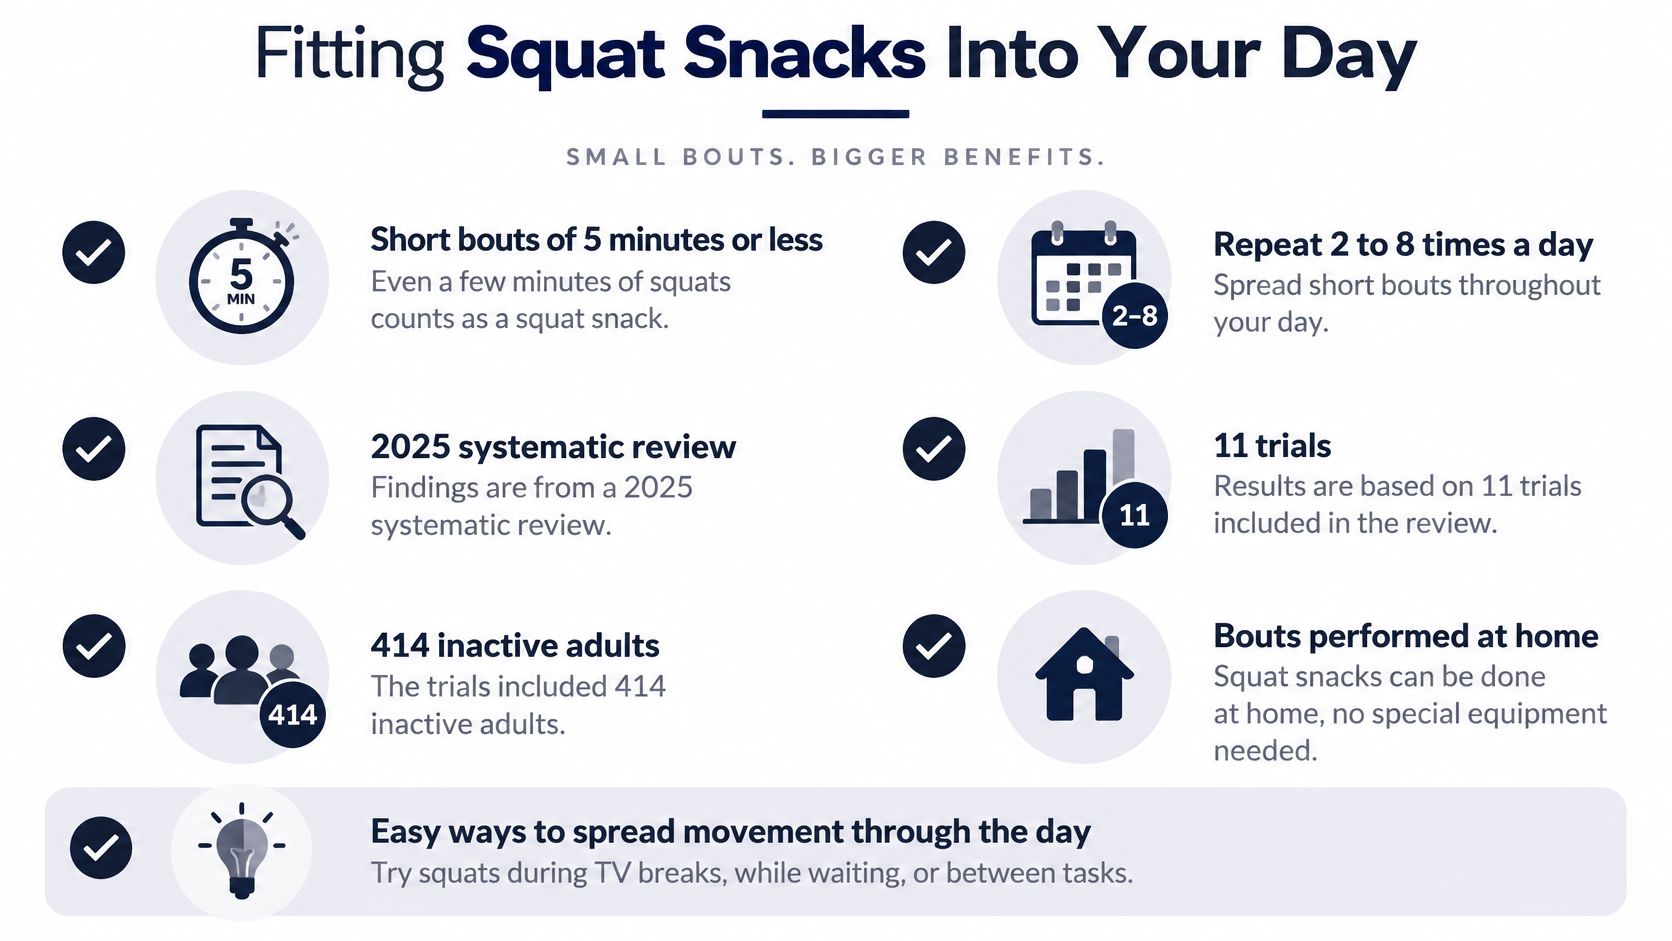
The British Journal of Sports Medicine blog summary of a 2025 systematic review and meta-analysis included 11 randomized controlled trials with 414 sedentary or physically inactive adults, using bouts lasting 5 minutes or less, at least twice daily, on 3 to 7 days per week, for 4 to 12 weeks. Compliance reached 91% and 83% of participants stuck with the program. A broader pattern in that summary was bouts of 1 to 5 minutes occurring 2 to 8 times per day.
A Sample Day
- Morning: One set of 8 to 12 squats while coffee brews, stopping with 2 to 3 reps in reserve.
- Midday: One set after a call or before lunch, same chair target, same tempo.
- Evening: One set between chores, only if your morning reps still felt clean.
On a planned training day, let your structured sets come first and treat snacks as extra accumulated movement, not extra tests. On rest days, snacks should stay easy. If you need ideas for spacing them, these exercise snacks examples show how brief bouts fit ordinary routines.
Set honest expectations. The 2025 systematic review in PMC covering 12 randomized controlled trials and 483 adults found exercise snacks improved maximal oxygen uptake and reduced total and LDL cholesterol, but found no significant improvement in body weight, body fat, HDL cholesterol, or triglycerides. The evidence covers exercise snacks as a category over 4 to 12 weeks, not squats alone. Snacks are a realistic way to interrupt sitting and build consistency. They aren't a guaranteed fat-loss method, and I wouldn't sell them as one.
Log your first Week 1 session today, two sets to your chair target, and note your reps in reserve. With SuperStrong, each set you log lands as a tile on a shared wall with up to four friends, so your morning, lunch, and evening squat snacks add up visibly across the week. Visit SuperStrong to start your wall, pick your three training days, and let small clean sets do the accumulating.