Wide Arm Press Ups: Technique That Protects Shoulders
 13 min
Put your hands as wide as possible if you want a bigger chest. That's the popular advice, and it's too simple. Wide arm press ups can feel intense in the chest and shoulders, but feeling stretched isn't the same as getting a better training stimulus. Hand width changes lever lengths, shoulder stress, and how much help your triceps can give. Treat it as a measurable setup choice, start modestly wide, and let shoulder comfort and clean depth decide whether you stay there.
Table of Contents
- Set Your Hand Width
- How to Do a Wide Arm Press Up
- Choose Width by Goal
- Fix Common Wide Press-Up Faults
- Easier Versions for Short Sets
- Set Your Width and Log the Next Set
Set Your Hand Width
Measure your shoulder width from the bony point outside one shoulder to the same point on the other side. Say that distance is 40 centimetres. A standard press up puts the index fingers about 40 centimetres apart, a narrow version about 20 centimetres, and a wide version about 60 centimetres. Use tape marks or floorboard lines for your first sessions so you're not guessing from set to set.
The Strength and Conditioning Journal biomechanics review defines wide placement at approximately 150% of shoulder width, compared with about 100% for standard and 50% for narrow. Moving the hands outward increases the horizontal distance between your hands and torso, which changes loading at the shoulders and elbows. It doesn't add weight. It changes where the work is hardest to control.
Reviews generally link wide hands with more pectoralis major and anterior deltoid emphasis and narrow hands with more triceps brachii involvement. That pattern is useful, but it isn't absolute. Narrow base press ups can also produce greater activation of the sternal head of the pectoralis major than wide base work.
| Position | Hand spacing | Muscle emphasis | Use it when |
|---|---|---|---|
| Narrow | About 50% of shoulder width | Triceps brachii; sternal pectoralis major can also be higher | Triceps emphasis or when a wide base feels unstable |
| Standard | About 100% of shoulder width | Balanced pectoralis major, triceps and scapular demand | Default press up and most short home sets |
| Wide | About 150% of shoulder width | Pectoralis major and anterior deltoid; less relative triceps; serratus anterior highest in one push-up-plus test | Accessory work only while shoulders stay comfortable |
Practical rule: Treat 150% as the wide category, not as a score to beat by crawling farther out.
Before your hands move, lock in a stable starting body line using the cues for a strong push up position and plank. Then choose one spacing and repeat it exactly. A repeatable width lets you judge progress accurately. If each session starts with different hand placement, rep changes may only reflect an easier or harder setup rather than stronger pressing.
How to Do a Wide Arm Press Up
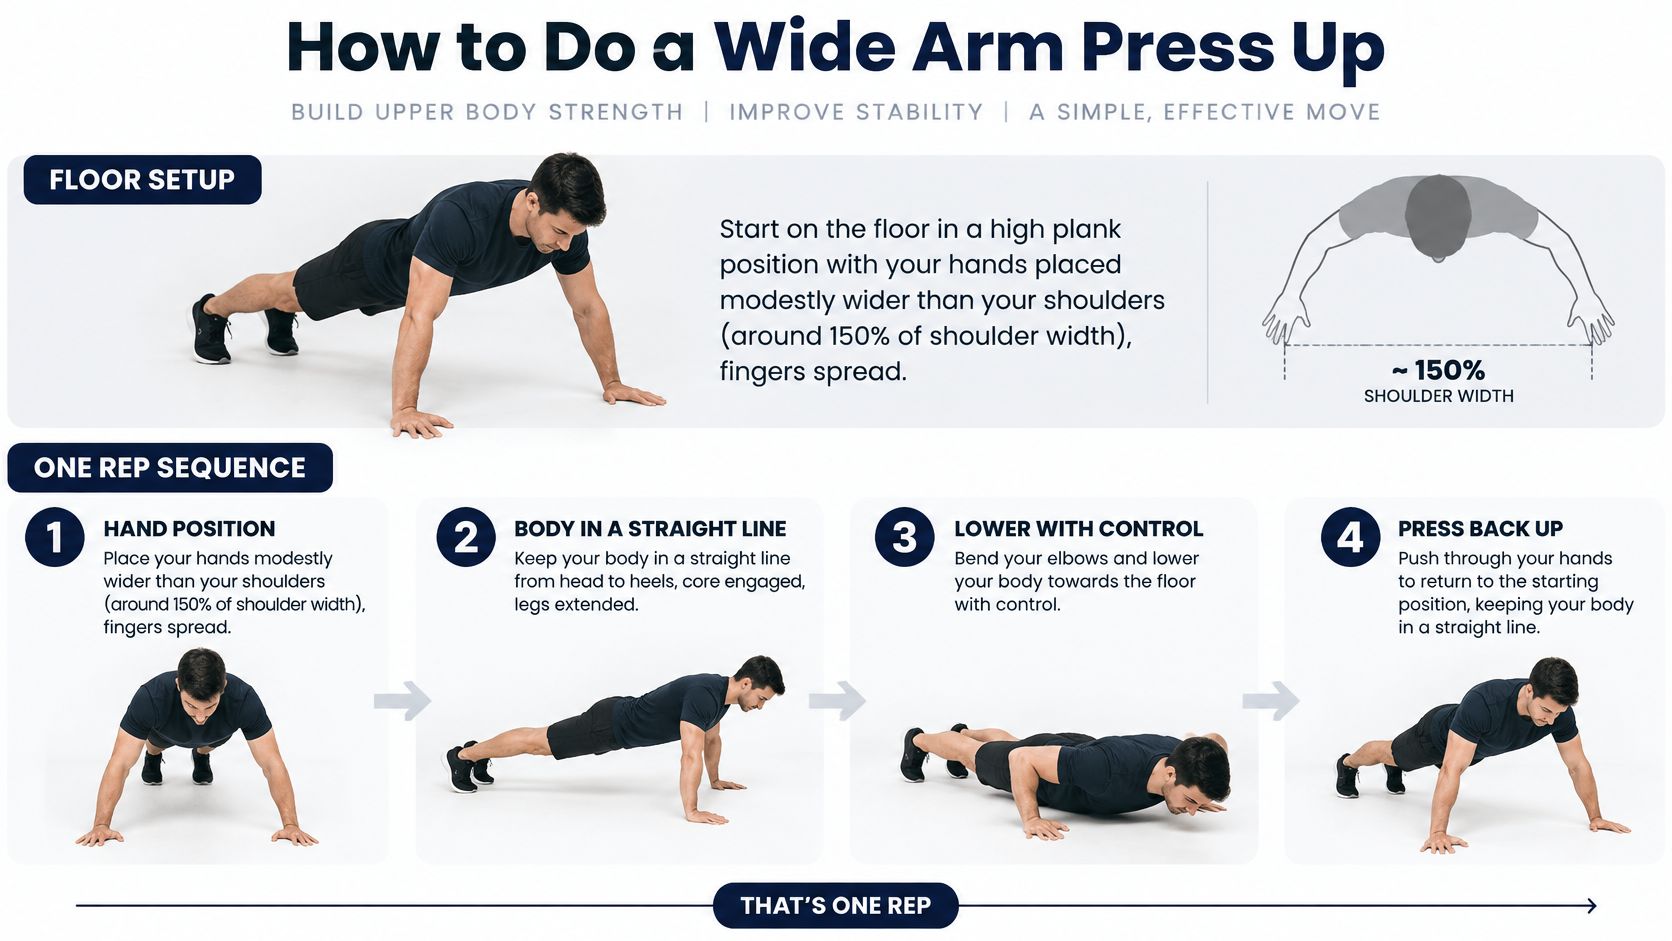
Start only modestly wider than your shoulders, even if your eventual wide position is near 150%. The Cleveland Clinic push up guide cautions that excessive width can increase shoulder stress, so progress gradually and only while you stay pain free. Your first wide reps should look calm, not like you're trying to stretch across the room.
Use this visual sequence to match your floor setup before you begin.
Build One Clean Repetition
- Set your hands first. Spread your fingers, press through the whole palm, and stack each wrist under or slightly outside the elbow. A secure hand contact keeps the wrist from rolling as fatigue builds.
- Create one body line. Place your head, trunk, pelvis, and knees in line and brace your abdomen and glutes. This brace stops your hips from dropping when the wider base makes pressing harder.
- Lower for 2 to 3 seconds. Bend the elbows and bring your chest close to the floor without bouncing. Slow lowering gives you time to notice shoulder shrugging or elbows snapping outward.
- Keep a moderate elbow flare. Don't force a rigid 90 degree T between upper arm and torso. An arrow like path is usually easier for shoulders to tolerate.
- Press the floor away. Straighten the elbows while letting your shoulder blades move naturally around the ribs. Don't yank your shoulders toward your ears at the top.
- Reset before the next rep. Rebrace your trunk and check that your hands haven't crept wider. End the set when depth, body line, or elbow path breaks down.
Watch the movement once at normal speed, then compare your elbow path and torso line against it.
Dose and Quality Check
Use 2 to 3 sets of 5 to 12 controlled repetitions. That's enough to practise the wide setup without turning the final reps into partial, rushed movements. Rest long enough that the next set starts with the same brace and hand position.
These reps aren't light just because there's no barbell. The U.S. Army physical training fundamentals chapter summarises traditional push up loading at approximately 69.16% of body mass in the raised position and 75.04% in the lowered position. That load explains why five strict reps can be a sensible session.
Finish with one rep and grade it carefully. Your body stayed in one line, your chest approached the floor, your shoulders stayed away from your ears, and the front of each shoulder stayed quiet. If your lower back sagged, the range shortened, or your elbows flared hard, the floor version is too much today. Move your hands to a higher surface or use a knee variation rather than collecting sloppy reps.
Choose Width by Goal
A wide stretch feels productive. The chest pulls tight, the shoulders shake, the reps drop fast. That feeling is feedback about position and tension, not proof of faster growth.
Hand width works like shoe size for a runner. The right fit lets you repeat clean reps week after week. Too wide and the joints complain. Too narrow and a different muscle does most of the work.
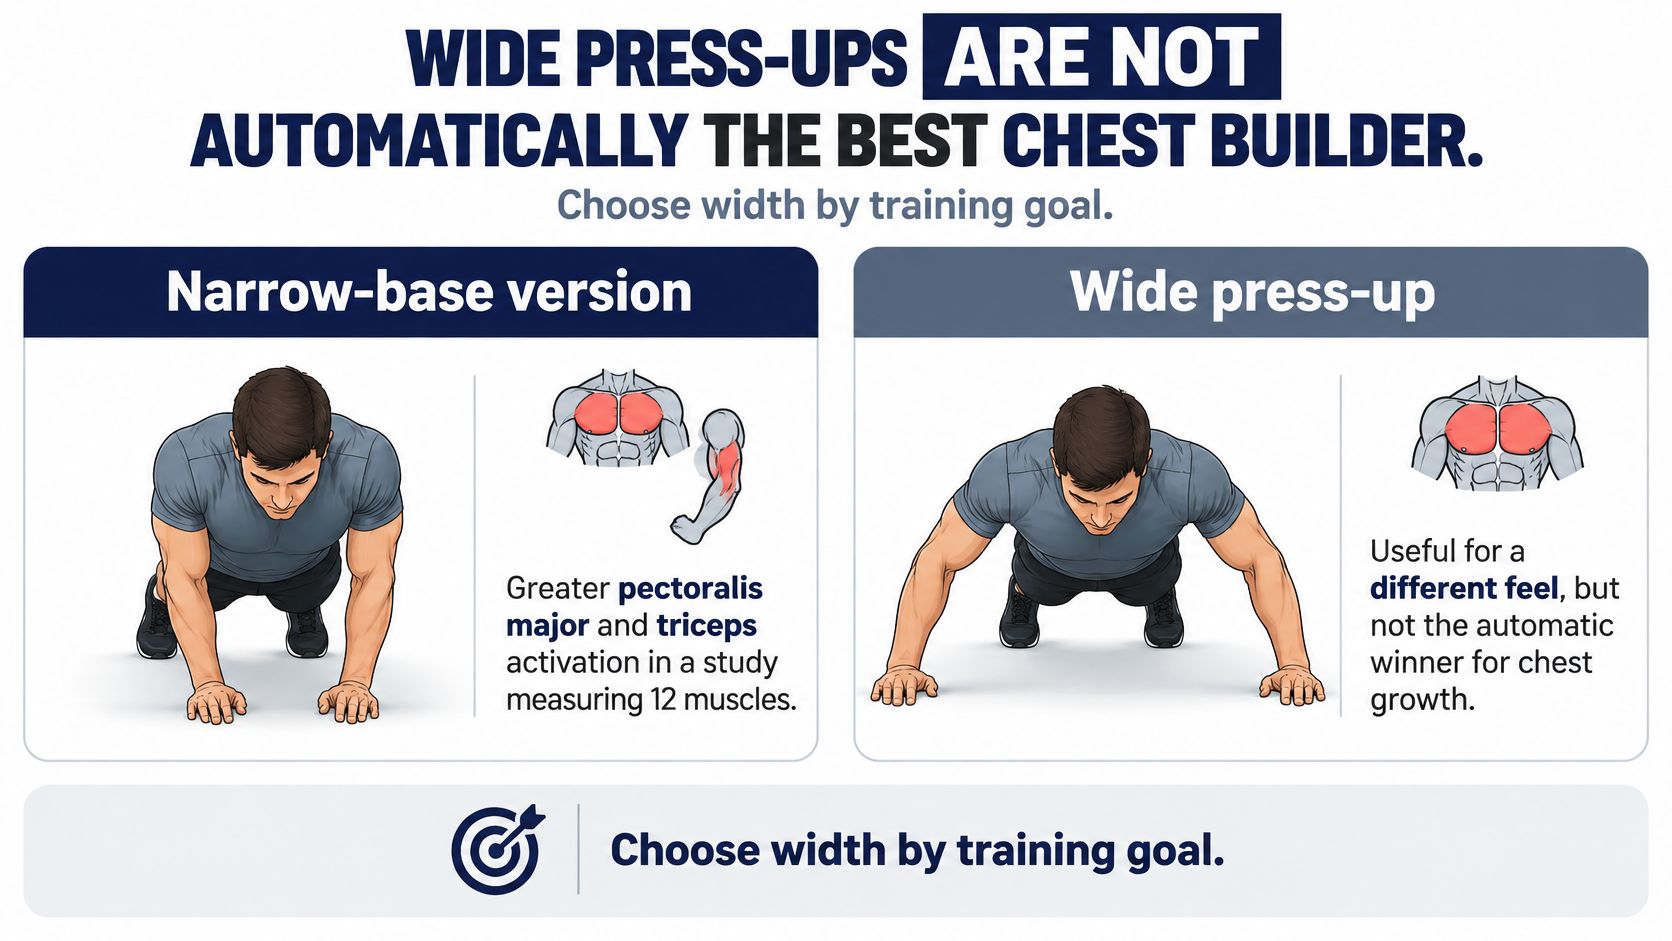
The evidence on wide hands and chest emphasis is mixed. A study of base positions measuring 12 muscles reported greater pectoralis major and triceps activity with a narrow base than with a wide base in that setup. Other summaries have described more chest and front shoulder emphasis with wider hands. EMG records electrical activity during one task. It does not prove which width builds more muscle over months.
Progressive, repeatable, pain free training decides the result. Pick the width you can control for full depth and steady tempo, then progress it.
| Goal | Better first choice | Why | Wide-arm role |
|---|---|---|---|
| Chest stimulus | Standard or narrow | Results vary by setup, and activation is not proof of growth | Optional accessory, not the only press |
| Triceps | Narrow or diamond | Closer hands tend to ask more from the triceps | Limited, use sparingly |
| Elbow and pressing strength | Standard | Mid width is easier to load with clean reps | Not the main strength choice |
| Shoulder comfort | Standard or modestly wide | Very wide positions raise stress for many lifters | Use only if the front of the shoulder stays quiet |
| Scapular control | Controlled standard, incline or push-up plus | Wide positions change shoulder blade demands | Monitor position, do not chase maximum width |
Pick one primary width for the week. If your main aim sits within a broader plan to build upper body strength at home, make standard or narrow your main press and keep wide work as a second slot. Compare sessions only when depth and tempo match.
Fix Common Wide Press-Up Faults
Most faulty wide sets fail in a predictable order. First, the hands creep outward. Then the elbows lock sideways, the shoulders climb, the hips lose tension, and the final reps become quick dips that never reach the target depth. Your count rises while the quality of each repetition falls.
Comparative EMG evidence in a review of push up variations and muscle activity indicates wider placement can produce lower pectoralis major and triceps activation than standard or diamond configurations. That should remove the pressure to force maximum width. Use wide reps as a technique specific accessory, perform pain free sets, and stop with roughly 1 to 3 repetitions in reserve.
| What you see or feel | Why it matters | Fix on the next rep |
|---|---|---|
| Hands as wide as possible | Raises shoulder stress and can alter scapular rotation | Move in toward modest width, near 150% of shoulder width |
| Elbows locked in a T | A rigid 90-degree flare is less shoulder-tolerant | Use a moderately flared elbow path |
| Shoulders shrug or collapse | Loses scapular control at the bottom | Press the floor away and let the shoulder blades move without shrugging |
| Bounce or partial reps | Inflates the count and repeats an irritating position | Lower for 2-3 seconds and count only reps with the chest near the floor |
| Hips sag or pike | The brace is lost and the lumbar spine moves | Stop the set and regress to the easier version |
| Front or top shoulder pain | Stop signal, not a target sensation | Reduce width, elevate the hands, or switch to a standard grip |
Change One Variable at a Time
Start with width. Bring each hand in by a few centimetres and repeat two test reps. If the shoulder still feels crowded, raise your hands to a bench or counter. Change grip last, perhaps by using handles for a more neutral wrist.
Changing everything at once leaves you unsure what helped. One adjustment gives you a clear answer. If a narrower setup removes the pinch and restores depth, keep that setup for the rest of the session.
Pain at the front or top of your shoulder isn't evidence that the chest is working harder. It's your cue to change the exercise.
Don't try to rescue a painful set with faster reps. Reduce the width, raise your hands, or use a standard grip. A clean standard rep trains pressing better than a wide rep you have to guard against.
Easier Versions for Short Sets
Short sets work best when the variation is easy to set up correctly between tasks. You're not chasing a maximum attempt beside your desk. You're collecting a few clean reps, then returning to your day with your shoulders feeling normal.
Use this ladder from least to most load: wall, kitchen counter, sturdy chair or bench, knees on the floor, then full floor press up. Push the furniture against a wall first so it can't slide. Keep the same modest hand width, straight body line, and 2 to 3 second lowering phase at every level.
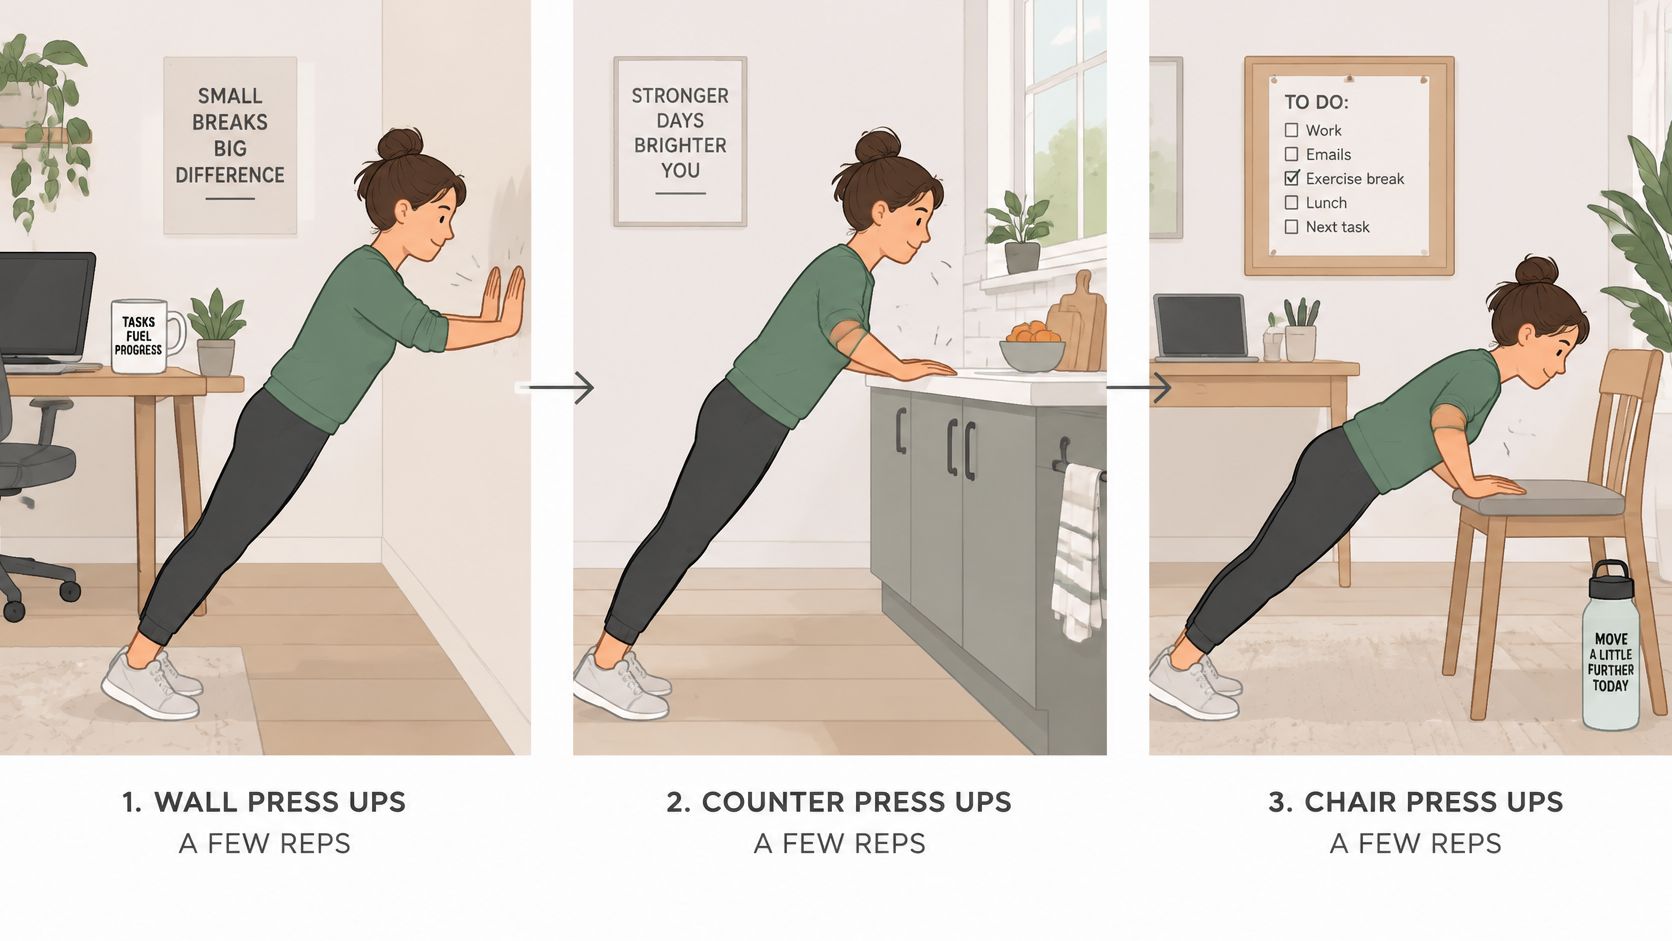
A 2025 hand position study found wide grip push ups produced greater posterior deltoid involvement and altered scapular rotation patterns, with hand position linked to shoulder joint stability. That's why beginners and people returning after inactivity shouldn't copy the widest demonstration they find. A position that feels manageable once can become irritating when repeated several times a day.
A Realistic Exercise Snack
Say you're working at home and choose counter press ups. Do 5 controlled reps before a call. Later, do another 5 while the kettle boils. Add a third set only if your shoulders and wrists feel completely normal and your body line looks the same as it did in the first set.
- Sore wrists: Grip push up handles, hexagonal dumbbells, or a counter edge so your wrists stay closer to neutral.
- Uncertain shoulders: Use the wall or counter and keep the elbows in a moderate arrow path.
- Shaky body line: Stay on an incline, because it preserves the full plank shape while reducing load.
- Repeated discomfort: Switch to standard width or skip the next short set.
Brief, repeated activity can lower the time barrier, but it doesn't remove the need for recovery. Poor mechanics spread across the day still expose the same joints to the same problem repeatedly. Frequency helps only when each small dose stays technically clean.
Apply one clear pain rule. If the same spot in your shoulder hurts during a set, don't test it again at the next break. Choose a higher surface, narrow the hands, or leave pressing for that day. Move down the ladder only after several clean sessions where depth, tempo, and body line stay consistent.
Progression test: A harder version is earned when the easier one looks boringly tidy, not when you can survive a few ugly reps.
Set Your Width and Log the Next Set
Choose your hand position before the week starts. Use standard width if your shoulders are unsure, modestly wide near 150% if it feels pain free, or narrow when triceps work is the point of the set. Don't test all three every day.
Pair that width with one repeatable surface. It might be the kitchen counter before breakfast, a bench after work, or the floor when you're fully warmed up. The same surface makes your reps comparable and removes setup decisions when time is short.
Keep the session target from your technique work and stop before form breaks. If the front or top of a shoulder complains, act immediately: move to a higher surface or bring your hands in. Don't finish the planned number just because it's written down.
Log the set the same day in a bodyweight workout journal, including the surface, hand width, reps, and shoulder response. Those details matter more than the rep total alone. Six counter reps at standard width with quiet shoulders tell you something different from six floor reps in a painful wide position.
Now do one quality set. Measure the hand spacing, brace, lower slowly, and stop while the reps still look controlled. Write down the width that felt strongest and most comfortable. That's your starting setup for the next session, not the widest position you can reach.
Use SuperStrong to log each short press up set as a visible tile on a private wall shared with up to four friends, with tile size reflecting your reps and a simple three day weekly rhythm. Record today's width controlled set, keep the goal small until it feels easy, and let the growing wall show your consistency.