Triceps Workouts Without Weights: 7 Moves That Work
 18 min
You can train your triceps effectively with nothing but the floor, a sturdy chair, and the right technique. Long gym sessions aren't the only workable format, either. A 2024 systematic review of exercise snacks identified 12 studies of repeated short activity bouts, and all reported at least one positive health outcome.
That doesn't mean a quick set of chair dips guarantees bigger arms. It means short, repeatable sessions deserve a place in your routine, provided you make the exercises progressively harder instead of repeating comfortable sets forever.
Your triceps straighten your elbows, which makes them essential to push-ups, dips, and overhead pressing variations. You don't need to isolate them completely to train them well. You need enough resistance, controlled movement, and a version you can perform without irritating your wrists, elbows, or shoulders.
Start with the right rung: Choose the hardest variation you can repeat cleanly, not the hardest variation you can survive.
These triceps workouts without weights use familiar movements as a difficulty ladder, with easier entries and harder progressions for each. The ladder isn't strictly numerical: an incline close-grip push-up is a better starting point than a floor diamond push-up, and chair dips are optional if your shoulders dislike them.
Pick a suitable movement, perform a controlled set between daily tasks, and stop before your technique unravels. Consistency matters, but so does giving tired pressing muscles time to recover.
Table of Contents
- 1. Diamond Push-Up
- 2. Bench Dip (Chair Dip)
- 3. Close-Grip Push-Up
- 4. Decline Push-Up
- 5. Pike Push-Up
- 6. Parallel Bar Dip
- 7. Isometric Lockout Hold (Top-Position Push-Up Hold)
- 7 Bodyweight Triceps Exercises at a Glance
- Putting It Together With Short Sets That Stack Up
1. Diamond Push-Up
The diamond push-up earns its place through demanding elbow extension, not through making your hands form a perfect shape. In an ACE exercise comparison, triangle push-ups produced the highest normalized triceps activation among the tested exercises.
That was an acute muscle-activation comparison, not proof of superior long-term muscle growth. Still, it supports using this movement as a demanding main exercise rather than an obligatory finisher after you're already exhausted.
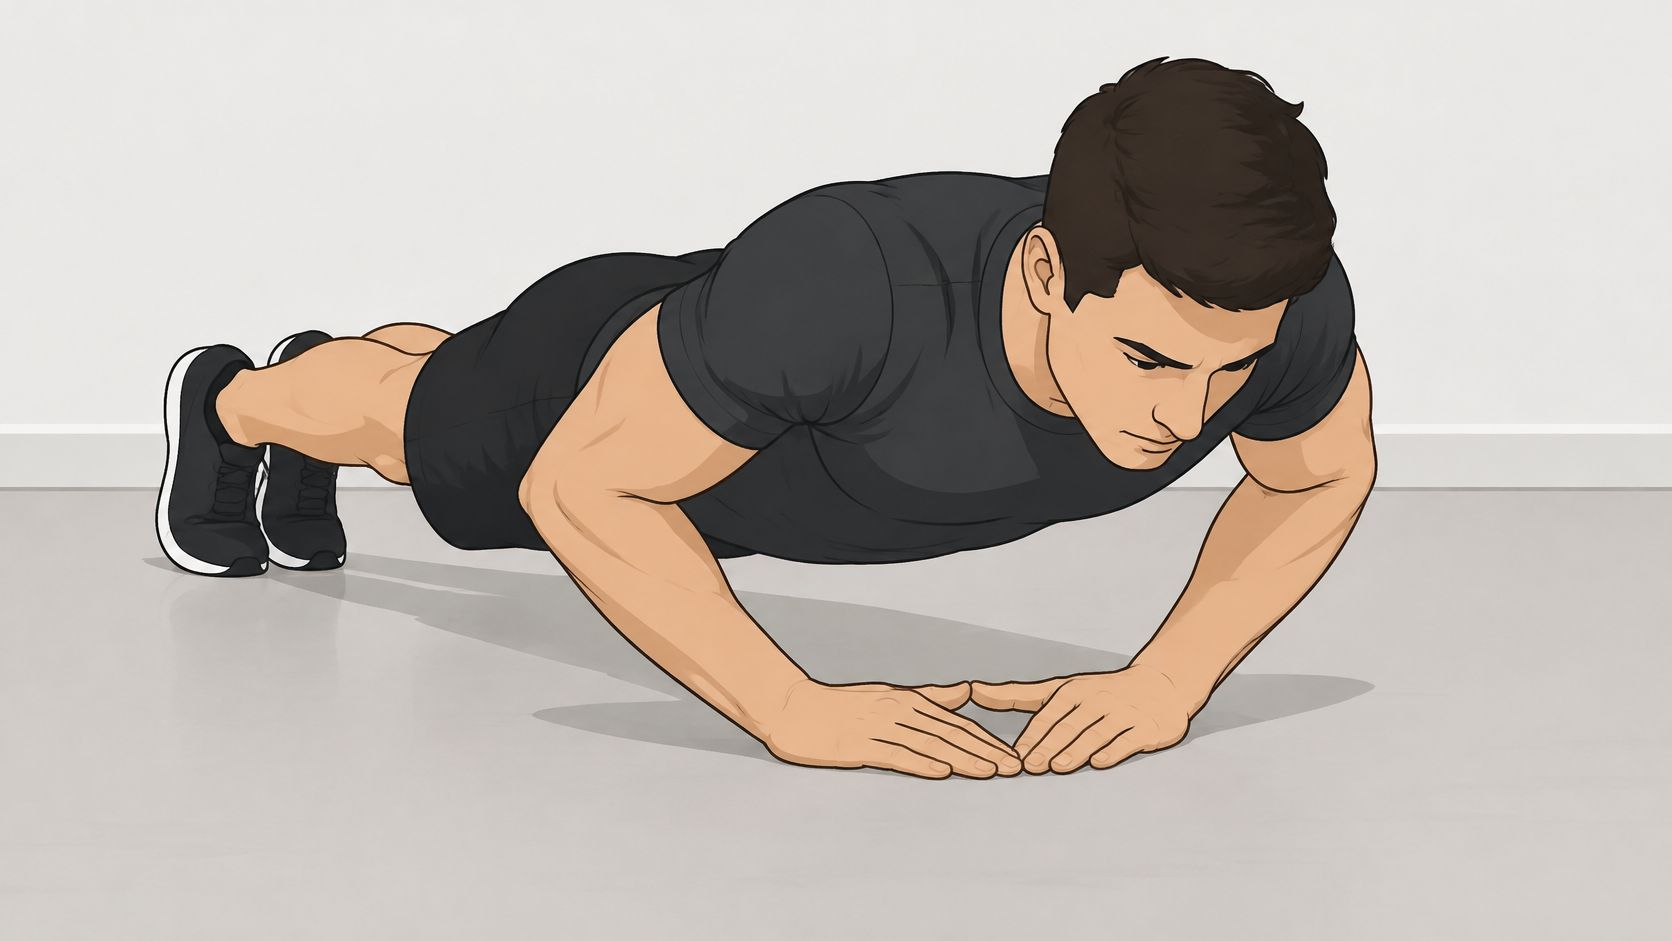
Build the Shape Around Your Joints
Place your hands beneath your chest, bringing your thumbs and index fingers toward each other. Brace your abdomen and lower your chest toward your hands while allowing your elbows to travel back on a comfortable diagonal.
Press until your elbows straighten, without snapping them backward. Your chest and hips should rise together; lifting your shoulders first and dragging your hips upward turns the repetition into a different movement.
- Easier entry: Put your hands on a fixed kitchen counter and keep your body straight.
- Main rung: Move to the floor once you can control the full descent and return.
- Harder progression: Slow the lowering phase or pause near the bottom before changing position.
Say you've finished a work call and have time for a short set. Use the counter if floor repetitions would become grinding attempts, then record the surface, clean repetitions, and how much effort remained.
Don't force the diamond. Separating your hands slightly is better than twisting your wrists to satisfy a visual cue. A close-grip variation is a useful substitute, while a fist-based version is only appropriate if your knuckles tolerate the surface and you can maintain stable wrists.
Finish while you could still perform another clean repetition. Save near-failure efforts for a variation you already control.
2. Bench Dip (Chair Dip)
A chair dip is accessible, but it isn't automatically beginner-friendly. Your hands sit behind your torso, so the movement asks your shoulders to tolerate a position that some people find uncomfortable even with their feet firmly planted.
Use a rigid, non-wheeled chair secured against a wall, or a fixed bench. A soft couch edge, folding chair, or slippery seat isn't a worthwhile compromise.
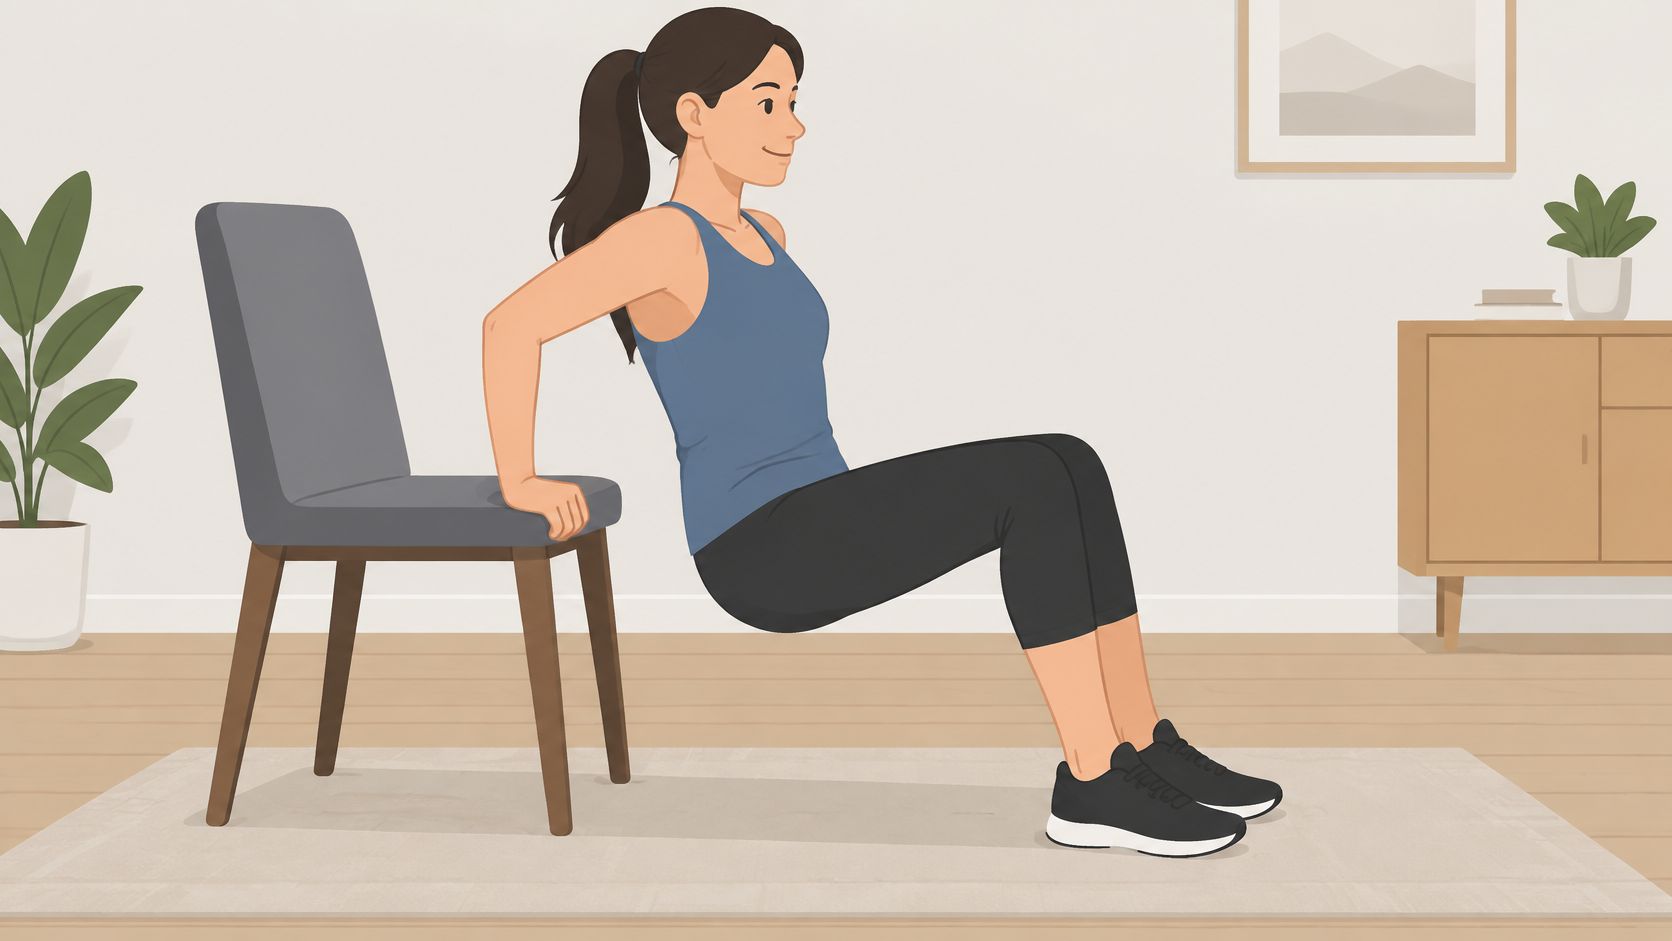
Keep the Range Smaller Than Your Ambition
Sit on the edge, grip beside your hips, and move your hips just clear of the seat. Keep your knees bent and your feet close enough to help support your weight.
Bend your elbows while keeping your back near the chair. Stop before your shoulders roll forward or you feel a pinch at the front of the joint, then press back up smoothly.
A deeper dip isn't a better dip when your shoulders have to roll forward to reach it.
Your elbows should generally travel backward, but don't squeeze them into an unnaturally narrow track. Keep your neck relaxed and avoid dropping into the bottom position.
Progress through assistance before depth. Start with substantial support from your legs, then let your arms handle more of the work as control improves. Moving your feet farther away and gradually straightening your legs makes the movement harder, but neither change gives you permission to sink deeper.
For a kitchen-break set, check the chair before every attempt, perform controlled repetitions, and stop while you can still press without shrugging. If the surface shifts, end the set immediately.
This is also an exercise you can skip entirely. If you feel shoulder discomfort despite reducing the range and increasing foot assistance, use incline close-grip push-ups instead. You don't need to earn your way through chair dips before progressing to other triceps exercises.
3. Close-Grip Push-Up
For most beginners, the close-grip push-up is the best starting movement on this list. It offers a useful middle ground: more emphasis on elbow extension than a broad-hand setup, without requiring the extreme hand position of a diamond push-up.
Place your hands slightly inside shoulder width, with your fingers spread and your palms firmly planted. Lower your chest between your hands while your elbows follow a comfortable diagonal, rather than flaring sideways or scraping tightly against your ribs.
Make Your Setup Repeatable
Use the same hand spacing and support height each session. If you move your hands wider, shorten the descent, and lift your hips as you tire, your repetition count stops telling you much.
A discussion of wide-arm press-ups can help you compare hand positions, but you don't need to alternate widths constantly. Choose a comfortable close grip and give yourself time to improve at it.
- Counter level: Use a fixed countertop when the floor version makes your hips sag.
- Lower incline: Move to a secure, lower support while keeping the same body alignment.
- Floor level: Bring your chest down under control and press your body up as a unit.
- More demanding: Add a deliberate pause or slower descent before chasing longer sets.
For a practical desk-day routine, perform a comfortable incline set after shutting down your laptop for lunch. Later, repeat only if your elbows feel normal and your pressing technique hasn't deteriorated.
Short sessions still need progressive difficulty. A systematic review of exercise-snack protocols describes promising fitness and endurance outcomes, but also discusses a synthesis that found no clear improvement in muscular strength.
The coaching implication is straightforward: frequent easy repetitions aren't a complete strength plan. When your current version becomes comfortably repeatable, adjust your body position or tempo instead of indefinitely adding more of the same.
4. Decline Push-Up
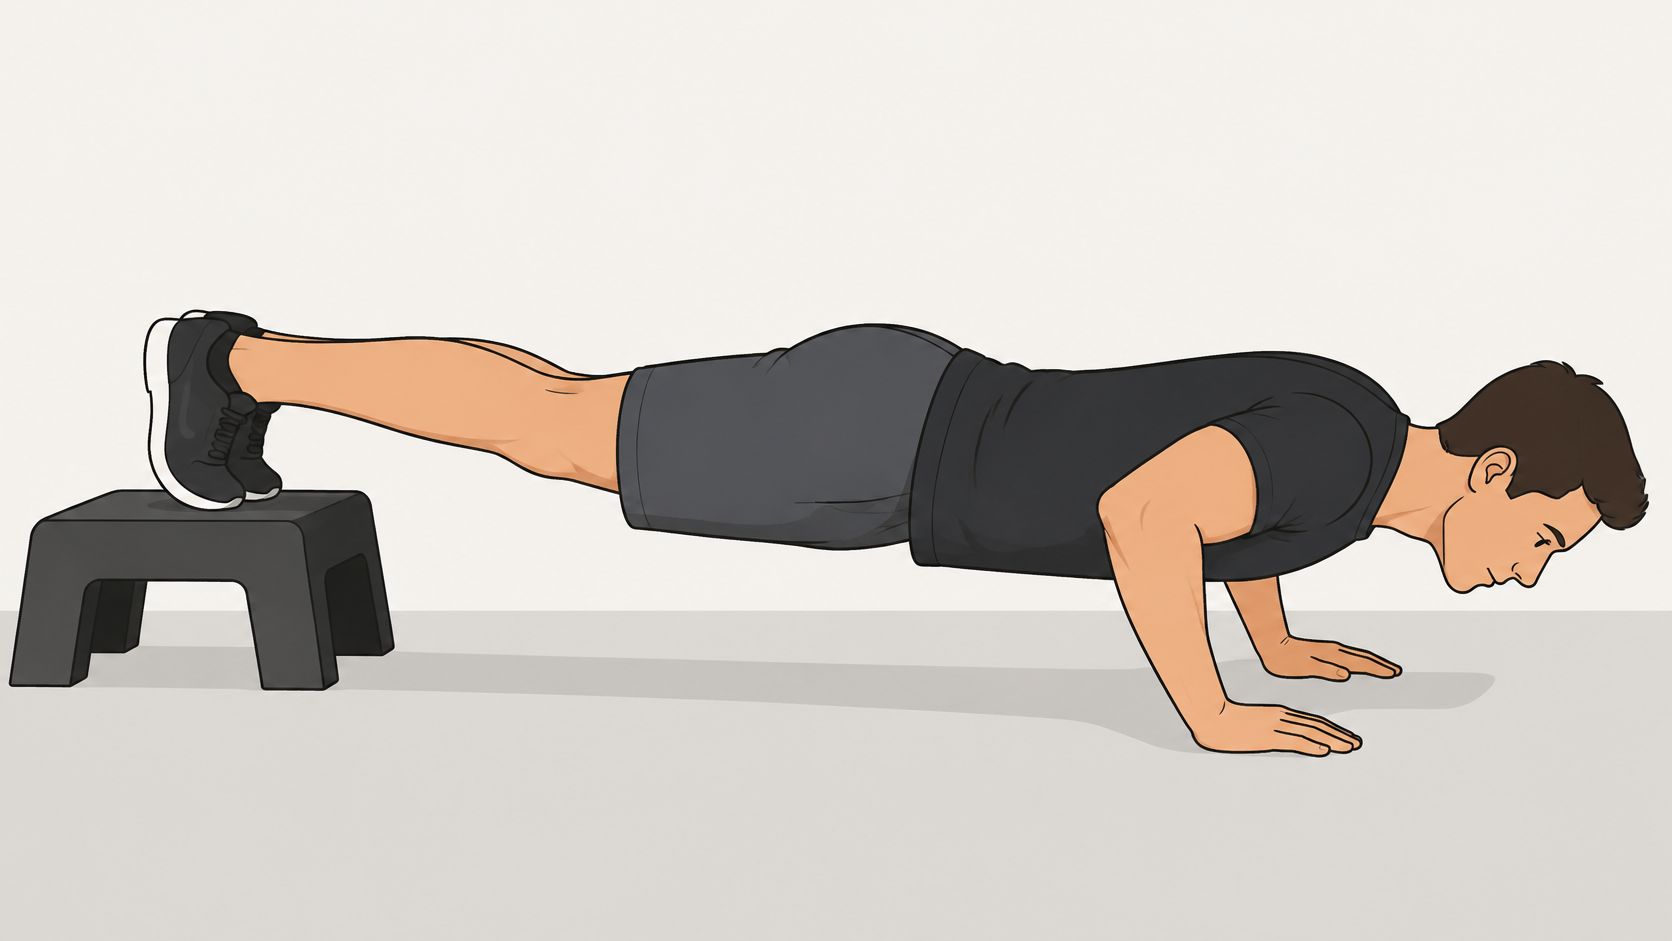
When floor push-ups stop providing enough resistance, raising your feet gives you a harder option without adding weight. It also increases the demand on your shoulders, so a decline push-up isn't a more isolated triceps exercise.
Start with a low, fixed step rather than immediately putting your feet on a tall chair. Test the support for movement before assuming the position.
Earn the Height
Set your hands slightly narrower than shoulder width and brace your abdomen before bending your elbows. Keep your head aligned with your torso rather than reaching your chin toward the floor to imitate extra depth.
Lower your chest between your hands, then press away while keeping your hips level. If your lower back arches or your hips rise first, reduce the elevation.
- Entry rung: Use a low step with ordinary controlled repetitions.
- Next rung: Add a pause near the bottom while preserving your body position.
- Advanced rung: Increase foot height only when the current setup remains stable and comfortable.
A useful home example is choosing a stair step for your first decline sessions. Record which step you used, whether you paused, and whether your final repetition looked like your first.
Change the height or the tempo, not everything at once. Otherwise, you won't know whether the new difficulty came from better loading or worse execution.
There's no requirement to progress to a dramatically higher position. Beyond a point, you're moving toward a different pressing task with greater shoulder emphasis.
Use decline push-ups as a demanding snack on a day when your upper body is reasonably fresh. Squeezing them between earlier diamond push-ups and a later dip workout may be convenient on the calendar, but your triceps still experience the combined workload.
5. Pike Push-Up
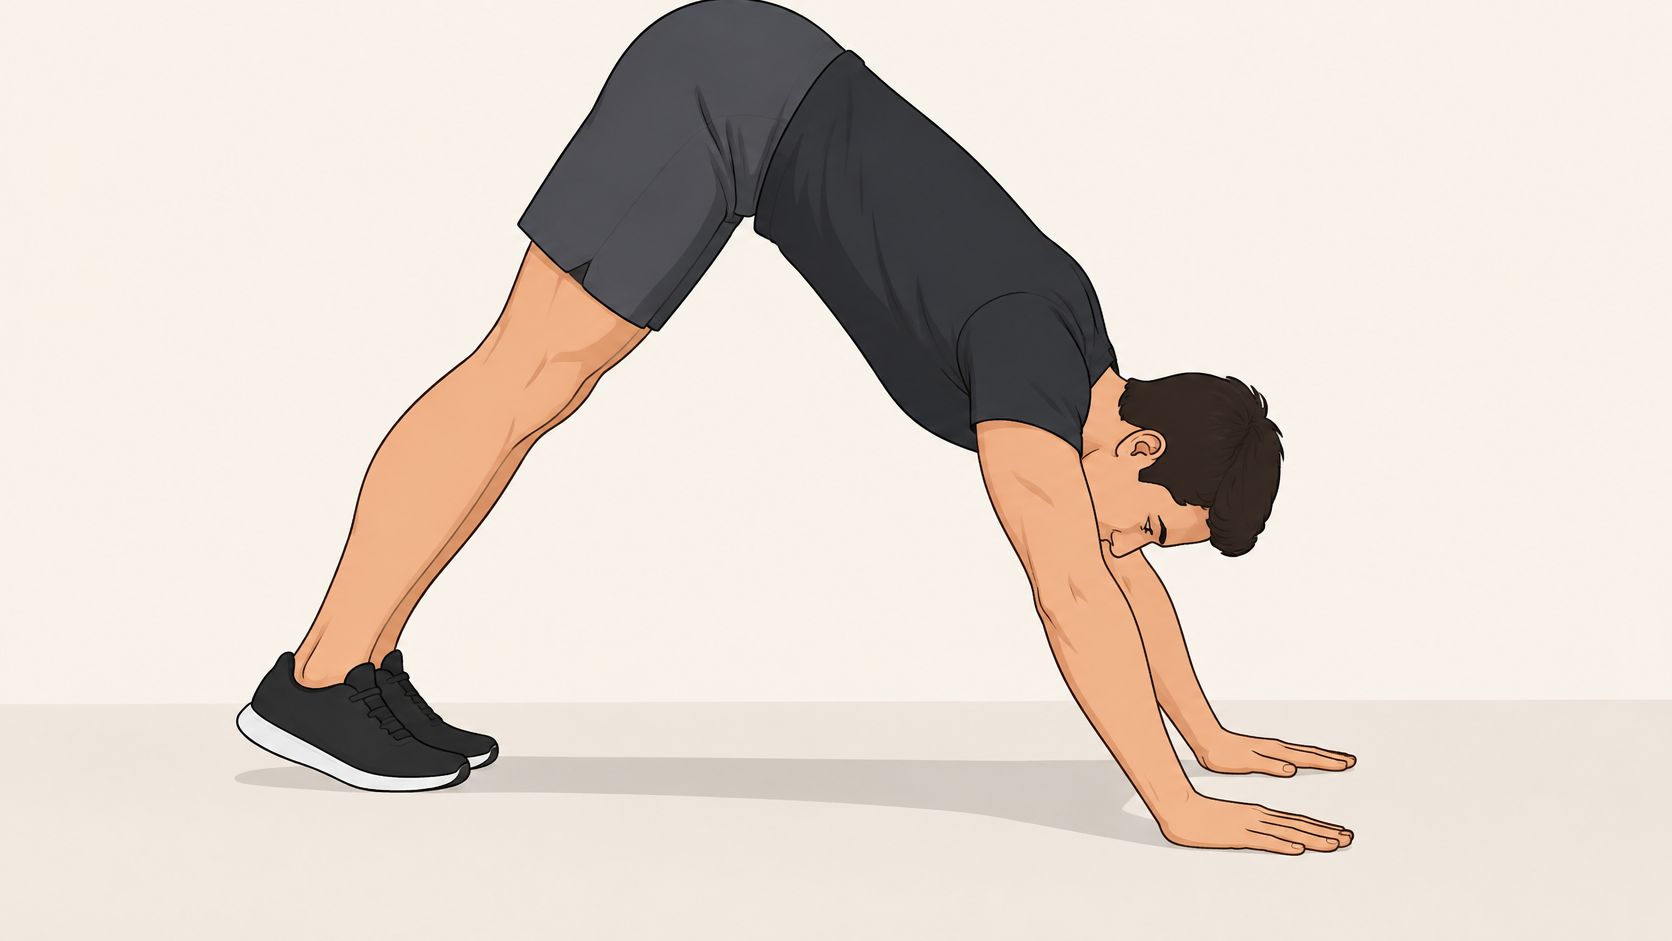
Pike push-ups are the overhead-pressing branch of the ladder. They involve the triceps, but your shoulders do substantial work, so don't treat them as a direct replacement for every close-grip push-up.
Begin with your hands around shoulder width and your hips raised into an inverted V. Bend your knees if needed to keep your pelvis lifted without forcing a hamstring stretch.
Move Your Head, Not Just Your Hips
Bend your elbows and guide your head toward the floor slightly ahead of your hands. Your forearms should remain controlled rather than collapsing inward or splaying sideways.
Press back up without letting your hips drop into a normal push-up. Keep your head clear of the floor throughout; this isn't an exercise for resting your weight on your neck.
Technique check: If you only nod your head while your elbows barely bend, make the variation easier and practise a genuine press.
Start with your feet on the floor and a manageable amount of forward weight shift. As you improve, bring your feet closer to your hands or raise them on a low, stable support.
Both changes can increase difficulty, but raised feet also make getting into and out of position more demanding. Don't use a chair until you can manage the floor version without wobbling.
For a between-task set, clear the floor, check that your hands won't slip, and perform a few deliberate repetitions before returning to your desk. Stop when you can't maintain the same head path or pressing range.
Pike push-ups are optional, not mandatory variety. If your main priority is triceps training and overhead pressing feels awkward, keep close-grip push-ups as your main movement. Use pikes when you also want to develop overhead pressing control, rather than adding them merely because your routine seems too short.
Moving toward handstand push-ups requires additional balance, positioning, and safety preparation. Don't assume stronger pike push-ups alone make an inverted attempt appropriate.
6. Parallel Bar Dip
Parallel bar dips belong near the demanding end of the ladder because your arms support your suspended body. Unlike chair dips, they require purpose-built bars or a suitable fixed outdoor station, so this option is weight-free, not equipment-free.
Start by learning a steady support position with your elbows straight and your shoulders controlled. If you can't hold yourself securely without shrugging or swinging, practise an assisted version before attempting full repetitions.
Use Real Bars, Not Furniture Substitutes
Check that the bars are secure, your hands won't slip, and your feet have clearance. Don't improvise with chair backs, loose stools, or furniture that can tip toward you.
A guide to home dip bars can help you assess the setup, but equipment doesn't remove the need for a controlled entry and exit. Low bars that let your feet assist can provide a more manageable starting point.
Use the supplied video as a movement reference alongside the setup and range-of-motion guidance.
From support, bend your elbows and lower only as far as you can maintain comfortable shoulder control. Press back up without kicking, bouncing, or forcing an exaggerated chest lift.
- Assisted rung: Keep your feet supported where the equipment allows, using your legs to reduce the demand.
- Full-body rung: Perform unassisted repetitions through a repeatable, comfortable range.
- Harder rung: Add a controlled pause or slower descent rather than chasing excessive depth.
Bending your knees while hanging doesn't meaningfully remove bodyweight from your arms. Assistance needs an external support, such as grounded feet or an appropriately secured resistance band.
For someone with access to a park station, dips might be a planned training-day set rather than a kitchen-break exercise. Keep the set submaximal, especially if you've already done push-ups.
The following image shows a pike-style movement, not parallel bar dip technique.
7. Isometric Lockout Hold (Top-Position Push-Up Hold)
A top-position hold is a useful entry rung, even though it appears last here. It lets you practise supporting yourself with straight arms before you can manage repeated push-ups.
It's also easier to overrate than a demanding dynamic exercise. Holding a well-stacked lockout isn't equivalent to repeatedly extending your elbows against resistance, and a longer hold doesn't automatically mean a stronger triceps stimulus.
Own the Support Position
Place your hands beneath your shoulders and extend your legs behind you. Brace your abdomen, tighten your thighs, and push the floor away without rounding your entire back.
Keep your elbows straight but don't force them backward into hyperextension. If straight-arm support causes pain, change the setup or stop rather than trying to toughen the joint through discomfort.
The push-up-position plank provides a useful reference for whole-body alignment. Your hips shouldn't sag, and your shoulders shouldn't collapse toward your ears as fatigue builds.
- Easier entry: Hold the position with your hands on a fixed countertop.
- Main rung: Move to floor support when you can breathe normally and maintain alignment.
- Useful progression: Add controlled push-up repetitions rather than extending every hold indefinitely.
Say you're waiting for a document to upload. A brief incline hold can provide a manageable practice opportunity, especially if you're returning to training and full push-ups are currently too demanding.
Keep it comfortable enough that the next session doesn't become a test of sore wrists. A static exercise is still loaded exercise, not a guaranteed solution for joint sensitivity.
A 2024 workplace resistance-exercise pilot involving 30 sedentary female university employees found increased muscle mass with brief workday training, but strength differences weren't statistically significant. That supports modest expectations for short resistance sessions, not claims that lockout holds alone will rapidly build your arms.
Use holds to develop confidence and control, then pair them with an appropriate dynamic progression.
7 Bodyweight Triceps Exercises at a Glance
| Exercise | Difficulty | Equipment Needed | Triceps Emphasis | Best For |
|---|---|---|---|---|
| Diamond Push-Up | Challenging; can be modified with an incline or knees | None | High | Bodyweight triceps work with no equipment |
| Bench Dip (Chair Dip) | Beginner-friendly; adjust with bent or straight legs | Stable chair, bench, or couch | High | Accessible triceps training at home |
| Close-Grip Push-Up | Moderate; requires basic push-up strength | None | Moderate to high | A wrist-friendlier step toward diamond push-ups |
| Decline Push-Up | Challenging; adjust using a lower or higher surface | Stable step, bench, or chair | Moderate; higher with a narrow hand position | Progressing beyond standard push-ups |
| Pike Push-Up | Challenging; requires shoulder strength and mobility | None; optional stable step or bench | Moderate; shoulders are the main focus | Building overhead pressing strength |
| Parallel Bar Dip | Advanced | Parallel bars | High | Building upper-body pressing strength and tracking dip progress |
| Isometric Lockout Hold (Top-Position Push-Up Hold) | Beginner-friendly | None | Low to moderate; focused on endurance and stability | Low-impact triceps endurance and stability work |
Putting It Together With Short Sets That Stack Up
You don't need to perform every movement. Choose a compact routine and distribute its sets between tasks, leaving enough recovery that each attempt still looks deliberate.
A randomized trial of bodyweight exercise snacks found that previously inactive adults completed more than the prescribed minimum of logged bouts. That makes short sessions a practical format worth trying, not permission to train your pressing muscles every time you pass the kitchen.
Beginner Micro-Sessions
Use these as separate brief bouts across a training day rather than rushing through them without recovery.
- After your morning routine: Perform incline close-grip push-ups on a fixed counter, stopping before your hips sag.
- During a later break: Try bent-knee chair dips through a comfortable range. Substitute another easy incline set if your shoulders object.
- Before finishing your day: Practise a lockout hold at an incline or on the floor, ending while you can still breathe and brace normally.
Start conservatively. If the opening set leaves your arms noticeably fatigued, skip the later pressing bout instead of treating the schedule as an obligation.
Advanced Micro-Sessions
Spread diamond push-ups, decline push-ups, and parallel bar dips across separate opportunities when suitable equipment is available.
- Diamond push-ups: Use controlled repetitions with a little effort in reserve.
- Decline push-ups: Keep the elevation modest enough to preserve alignment.
- Parallel bar dips: Use a secure station and a repeatable, pain-free depth.
You don't need every advanced movement on every training day. Alternate the demanding variations, and count other push-ups, burpees, and upper-body pressing toward the same workload.
A 2025 review of exercise snacks included only three strength-based studies among its reviewed interventions. Triceps-specific prescriptions therefore deserve caution: more frequent sets haven't been established as universally better.
Persistent joint pain, worsening soreness, or declining performance are reasons to reduce the workload and seek qualified advice when needed. Keep lower-body and pulling work in your broader plan rather than turning all available exercise time into pressing.
For tracking, SuperStrong is an iPhone app that turns logged sets into tiles on a shared wall with friends. Its training-day rhythm and small goals suit this approach, provided you treat the wall as a record of controlled work, not a reason to inflate repetitions.
Choose your starting variation, attach it to a daily task, and record what you performed. Progress when the movement becomes reliably easier, not because you want a bigger total.
SuperStrong turns each logged bodyweight set into a tile on a shared wall, making short triceps sessions visible alongside your friends' efforts. Visit SuperStrong to start tracking your at-home sets with small goals and social accountability.